Friday, September 30, 2016

Custom Settings VS Custom Metadata

What are custom metadata?
Before we get into custom metadata, lets first try to understand what is metadata? Metadata is simplest terms can be defined as data about your data. In other words its the information about your data. For eg: If you add a field on your account object. You would need to know its type (text, number, picklist etc), whether its required or optional, is there any default value etc. All this definition about your data is called metadata.

Custom metadata takes this concept and extends it by allowing developers to define there own metadata. 

OK, but where is it used?
Custom metadata types are ideal for any records that represent metadata for your app. In other words any records that represents configuration or controls the behavior of your app can be considered for custom metadata. For eg: You want to integrate your application with a number of endpoint. Typically you would create custom objects or custom settings to store the information about the API's. Each record would represent an actual integration. 
The problem with using custom object or custom settings for storing this information is that you can only deploy the definition of custom object or custom settings into another org. The records needs to be transferred separately in some other way. 
Solution: Metadata to rescue. Since the records of custom metadata are treated as metadata they can be deployed from one sandbox to another using change set or managed packages.

Will custom metadata replace custom settings?
In most of the cases Yes, custom metadata type can replace custom settings however there are use cases where you might want to use custom settings. Please see the below decision tree and comparison chart that could help you in deciding what to use.
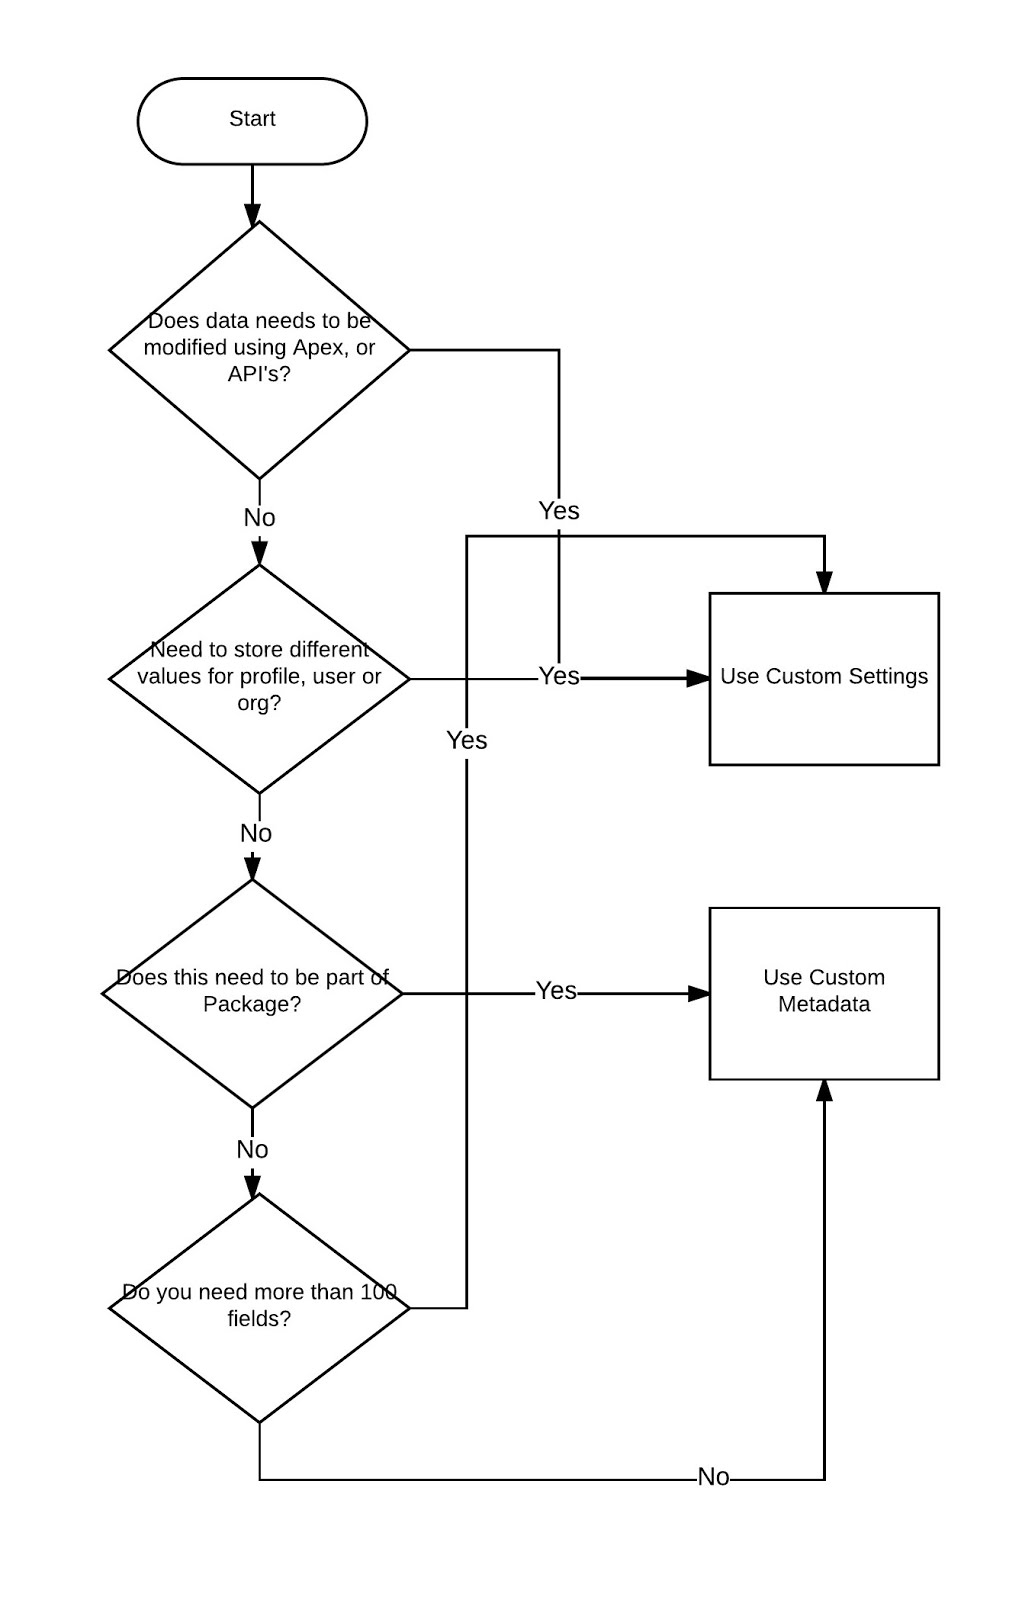
Decision Tree


Comparison Chart

How to use custom metadata?

Creating custom metadata is very similar to creation of custom object or custom settings.
Step 1: Go to Setup and search for "Custom Metadata Types"

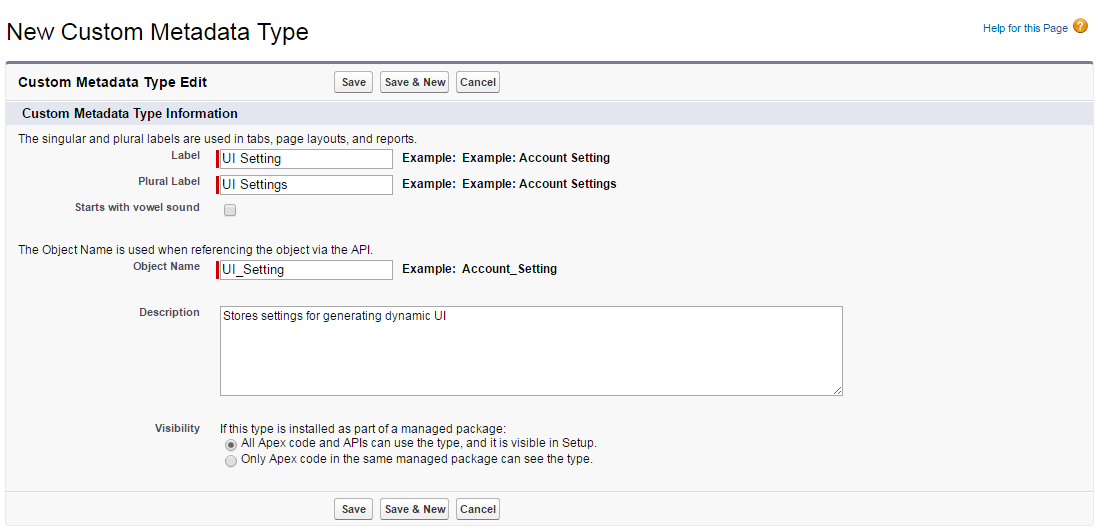
Step 2: Click on "New Custom Metadata Type"

Step 3: Save Custom Metadata Type

Step 4: Click on "New" in custom field section


Step 5: Create the required fields

Step 6: Click on "Manage UI Settings"

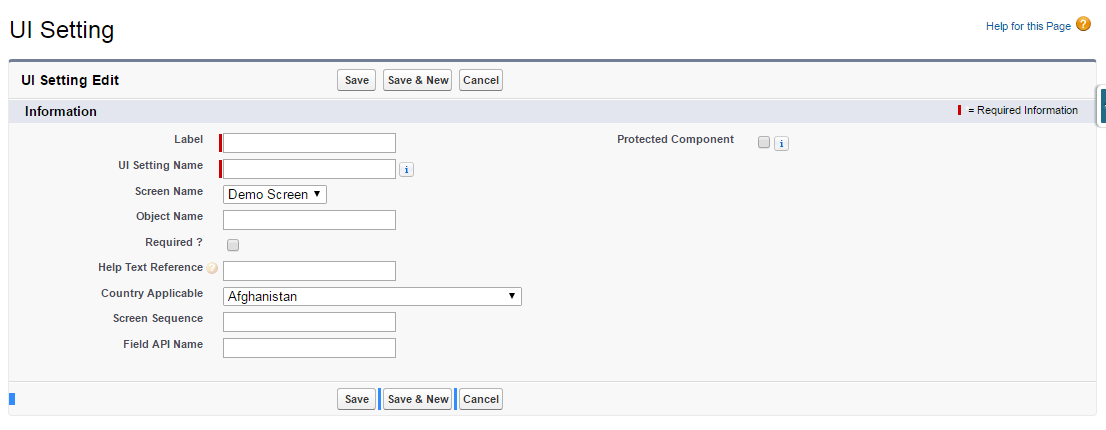
Step 7: Click on New and Create Records

Step 8: Query in Apex
 List<UI_Settings__mdt> fieldInfoList = [SELECT Id, DeveloperName, Country_Applicable__c, Help_Text_Reference__c, Object_Name__c, Required__c, Screen_Name__c, Screen_Sequence__c, Field_API_Name__c FROM UI_Settings__mdt];  


Thursday, September 22, 2016

Apply lightning design system (LDS) to existing visualforce pages

Disclaimer: General recommendation from salesforce - For existing pages - you don’t try to adapt them to match the visual design of Lightning Experience. There are two reasons for this. First, Lightning Experience is still evolving, and matching its styling yourself means you’re chasing a moving target. That’s work. Second, it’s even more work if you don’t have the tools to do it. In the current release, the tools are mostly not there. We have a number of ideas here and, Safe Harbor, we’re already hard at work at bringing them to you in a future release. So if you can wait, that’s our recommendation.

How to apply LDS to my existing visualforce pages
OK before we start modifying our code, lets first review few things to remember
  • <apex:pageblock> and <apex:inputField> are not supported with LDS, so unless you want your VF pages to be mix of LDS and classic view you need to refactor your code to avoid these elements.
  • If you are planning to use SVG Spritemap icons, add the attribute xmlns="http://www.w3.org/2000/svg" xmlns:xlink="http://www.w3.org/1999/xlink" to the <html> element or the parent <div> element
  • If using SVG spritemap image icons with IE, use the svg4everybody script

Now that we know what to look for lets try it out
First lets consider an existing VF page, this page creates account and contact record.

AccountContactVF

 <apex:page controller="AccountContactController">  
   <!-- ADD SECTION HEADER -->  
   <apex:sectionHeader title="Demo VF Page" subtitle="Create Account and Contact"/>  
   <apex:form >  
   <!-- CREATE PAGE BLOCK -->  
     <apex:pageBlock mode="edit">  
         <!-- SECTION TO CREATE ACCOUNT -->  
         <apex:pageBlockSection title="Account Info" columns="2">  
              <apex:inputField value="{!acc.Name}"></apex:inputField>  
           <apex:inputField value="{!acc.Type}"></apex:inputField>  
           <apex:inputField value="{!acc.ShippingStreet}"></apex:inputField>  
           <apex:inputField value="{!acc.ShippingCity}"></apex:inputField>  
           <apex:inputField value="{!acc.ShippingState}"></apex:inputField>  
           <apex:inputField value="{!acc.ShippingCountry}"></apex:inputField>  
           <apex:inputField value="{!acc.Shippingpostalcode}"></apex:inputField>  
         </apex:pageBlockSection>  
         <!-- SECTION TO CREATE CONTACT -->  
         <apex:pageBlockSection title="Contact Info" columns="2">  
              <apex:inputField value="{!con.FirstName}"></apex:inputField>  
           <apex:inputField value="{!con.LastName}"></apex:inputField>  
           <apex:inputField value="{!con.HomePhone}"></apex:inputField>  
           <apex:inputField value="{!con.MobilePhone}"></apex:inputField>  
         </apex:pageBlockSection>  
         <!-- ADD BUTTONS -->  
         <apex:pageBlockButtons >  
           <apex:commandButton value="Clear"/>  
           <apex:commandButton value="Save" action="{!saveAccCont}"/>  
         </apex:pageBlockButtons>  
     </apex:pageBlock>  
   </apex:form>  
 </apex:page>  


Lets take a quick look at the above VF page, just by looking at the page we can see that for the page to render properly we need make the following changes.

Must Have or Kind Of Must Have Changes:
  • apex:pageblock needs to be replaced with slds-panel
  • apex:inputfield needs to be replaced with apex:inputtext, apex:selectlist etc
  • apex:pageblocksection needs to be replaced with slds-panel__section
  • apex:pageblockbuttons needs to be replaced with a combination of slds-docked-form-footer and slds-button-group
  • Since we would be replacing few apex:inputField with apex:selectlist, we need to update the controller to handle the picklist values.
Optional or Nice To Have Changes:
  • Use slds-form--compound to allow better grouping of fields
  • Use inline icon to stylize text fields
  • Replace apex:pagesectionheader with slds-global-header_container

After making the necessary changes our VF page code will look like:

AccountContactLds

 <apex:page controller="AccountContactController" applyBodyTag="false" docType="html-5.0">  
   <head>  
     <!-- CUSTOM GENERATED STYLE SHEET -->  
     <apex:stylesheet value="{!URLFOR($Resource.SLDS212, 'assets/styles/salesforce-lightning-design-system-vf.css')}" />  
   </head>   
   <body>  
     <!-- REQUIRED SLDS WRAPPER - CUSTOM SCOPING CLASS USED WHEN GENERATING CUSTOM CSS -->  
     <div class="trailhead-lightning">  
       <!-- ADD GLOBAL HEADER -->  
       <header class="slds-global-header_container">  
         <!-- ADD GLOBAL HEADER ICON -->  
         <!-- ADD FLOT AND SPACING TO HAVE BOTH ICON AND TEXT IN SAME LINE -->  
         <div class="slds-col slds-float--left slds-m-right--small">  
           <!-- ADD ICON -->  
           <div class="slds-icon slds-icon_container slds-icon-standard-account slds-icon--medium">  
             <img src="{!URLFOR($Resource.SLDS212,'/assets/icons/standard/account_60.png')}" alt="" />    
           </div>   
         </div>  
         <!-- ADD GLOBAL HEADER TEXT -->  
         <div class="slds-col ">  
           <!-- ADD TEXT -->  
           <div class="slds-page-header__title slds-truncate">  
             Create Account and Contact  
           </div>  
         </div>  
       </header>  
       <!-- ADD PANEL -->  
       <div class="slds-panel slds-grid slds-grid--vertical slds-nowrap slds-form--compound" aria-labelledby="newaccountform">  
         <apex:form >  
           <!-- ADD SECTION GROUPS -->  
           <div class="slds-panel__section">  
             <legend class="slds-form-element__label slds-text-title--caps">ACCOUNT INFO</legend>  
             <div class="form-element__group">  
               <!-- ADD ROW -->  
               <div class="slds-form-element__row">  
                 <!-- ADD FIELDS -->  
                 <div class="slds-form-element">  
                   <apex:outputLabel styleClass="slds-form-element__label">Account Name</apex:outputLabel>  
                   <apex:inputText value="{!acc.Name}" styleClass="slds-form-element__control slds-input"/>  
                 </div>  
                 <div class="slds-form-element">  
                   <apex:outputLabel styleClass="slds-form-element__label">Account Type</apex:outputLabel>  
                   <apex:inputText value="{!acc.Type}" styleClass="slds-form-element__control slds-input"> </apex:inputText>  
                 </div>  
               </div>  
               <!-- ADD ROW -->  
               <div class="slds-form-element__row">  
                 <div class="slds-form-element">  
                   <apex:outputLabel styleClass="slds-form-element__label">Shipping Street</apex:outputLabel>  
                   <apex:inputTextarea value="{!acc.ShippingStreet}" styleClass="slds-form-element__control slds-textarea"/>  
                 </div>  
               </div>  
               <!-- ADD ROW -->  
               <div class="slds-form-element__row">  
                 <div class="slds-form-element">  
                   <apex:outputLabel styleClass="slds-form-element__label">Shipping City</apex:outputLabel>  
                   <apex:inputText value="{!acc.ShippingCity}" styleClass="slds-form-element__control slds-input"/>  
                 </div>  
                 <div class="slds-form-element">  
                   <apex:outputLabel styleClass="slds-form-element__label">Shipping State</apex:outputLabel>  
                   <apex:inputText value="{!acc.ShippingState}" styleClass="slds-form-element__control slds-input"/>  
                 </div>  
               </div>  
               <!-- ADD ROW -->  
               <div class="slds-form-element__row">  
                 <div class="slds-form-element">  
                   <apex:outputLabel styleClass="slds-form-element__label">Shipping Country</apex:outputLabel>  
                   <apex:selectList value="{!acc.ShippingCountry}" styleClass="slds-form-element__control slds-select slds-select_container" size="1">  
                        <apex:selectOptions value="{!countryList}"></apex:selectOptions>  
                   </apex:selectList>  
                 </div>  
                 <div class="slds-form-element">  
                   <apex:outputLabel styleClass="slds-form-element__label">Shipping Postal Code</apex:outputLabel>  
                   <apex:inputText value="{!acc.ShippingPostalCode}" styleClass="slds-form-element__control slds-input"/>  
                 </div>  
               </div>  
              </div>  
           </div>  
           <!-- SECTION GROUP ENDS-->  
           <!-- ADD SECTION GROUPS -->  
           <div class="slds-panel__section">  
             <legend class="slds-form-element__label slds-text-title--caps">CONTACT INFO</legend>  
             <div class="form-element__group">  
               <!-- ADD ROW -->  
               <div class="slds-form-element__row">  
                 <div class="slds-form-element">  
                   <apex:outputLabel styleClass="slds-form-element__label">First Name</apex:outputLabel>  
                   <apex:inputText value="{!con.FirstName}" styleClass="slds-form-element__control slds-input"/>  
                 </div>  
                 <div class="slds-form-element">  
                   <apex:outputLabel styleClass="slds-form-element__label">  
                     <abbr class="slds-required" title="required">*</abbr>   
                     Last Name  
                   </apex:outputLabel>  
                   <apex:inputText value="{!con.LastName}" styleClass="slds-form-element__control slds-input"/>  
                 </div>  
               </div>  
               <!-- ADD ROW -->  
               <div class="slds-form-element__row" xmlns="http://www.w3.org/2000/svg" xmlns:xlink="http://www.w3.org/1999/xlink">  
                 <div class="slds-form-element">  
                   <apex:outputLabel styleClass="slds-form-element__label">Phone Number</apex:outputLabel>  
                   <div class="slds-form-element__control slds-input-has-icon slds-input-has-icon--left">  
                     <svg aria-hidden="true" class="slds-input__icon">  
                      <use xlink:href="{!URLFOR($Resource.SLDS212,'/assets/icons/utility-sprite/svg/symbols.svg#call')}"></use>  
                     </svg>  
                     <apex:inputText value="{!con.HomePhone}" styleClass="slds-input" html-placeholder="(333) 333-3333"/>  
                   </div>  
                 </div>  
                 <div class="slds-form-element">  
                   <apex:outputLabel styleClass="slds-form-element__label">Mobile Number</apex:outputLabel>  
                   <apex:inputText value="{!con.MobilePhone}" styleClass="slds-form-element__control slds-input" html-placeholder="(444) 444-4444"/>  
                 </div>  
               </div>  
             </div>  
           </div>  
           <!-- FOOTER -->  
           <div class="slds-panel__section">  
             <div class="slds-docked-form-footer slds-button-group slds-float--right" role="group">  
               <apex:commandButton value="Clear" styleClass="slds-button slds-button--neutral"/>  
                     <apex:commandButton value="Save" action="{!saveAccCont}" styleClass="slds-button slds-button--brand"/>  
             </div>  
           </div>  
         </apex:form>  
       </div>  
     </div>  
   </body>  
 </apex:page>  

Supporting Apex Controller

 public class AccountContactController {  
   public Account acc{get;set;}  
   public Contact con{get;set;}  
   public AccountContactController()  
   {  
     acc = new Account();  
     con = new Contact();  
   }  
   public pageReference saveAccCont()  
   {  
     PageReference pg = null;  
     if(acc != null)  
     {  
       insert acc;  
       if(con != null && acc.Id != null)  
       {  
         con.AccountId = acc.Id;  
         insert con;  
         pg = new PageReference('/'+acc.Id);  
         return pg;  
       }  
       else  
       {  
         return pg;  
       }  
     }  
     else  
     {  
          return pg;  
     }  
   }  
   public List<SelectOption> getCountryList()  
   {  
     List<SelectOption> countryList = new List<SelectOption>();  
     countryList.add(new SelectOption('US','US'));  
     countryList.add(new SelectOption('CANADA','CANADA'));  
     countryList.add(new SelectOption('MEIXCO','MEIXCO'));  
     return countryList;  
   }  
 }  

Output
As you can see its quite a bit of work to apply lds to existing VF pages. However if you want to align the look and feel of your VF pages with lightning experience its well worth it.

Screenshots
Classic VF Page
LDS VF Page

Monday, September 19, 2016

Why and how to backup salesforce data

Why backup salesforce data? Isn't this done by salesforce automatically?
Yes, Salesforce does perform real time replication to disk for each of their data centers, and near-real time data replication between production data center and disaster recovery center. However, there are quite a few scenarios why you might want to have your own backup. Scenarios such as:

  1. Recover from data corruption
  2. Rollback for data migration activity
  3. Archive data to reduce data volume or to adhere to data retention policies
  4. Replicate data to warehouse

How to backup data?
Depending upon your backup requirements (Full, Incremental, Partial) you can choose to use salesforce native features such as Data Export or Data Loader or you can build your own custom solution. In case you decide to build your own solution there are 4 API's that you can choose from.

  • REST API
  • BULK API
  • SOAP API
  • Metadata API
How to choose the right API for the job?
Before we jump into identifying the right API for the job, lets first understand some of the limitation around these API's, knowing about these limitation will help us in deciding which API to use:


API
Governor Limit
Additional consideration
Objects Not supported
REST or SOAP
Unlimited Edition: 15,000 + (number of licenses X calls per license type) calls per 24-hour period.
The calculation of the API request limit based on user licenses is designed to allow sufficient capacity for your org based on your number of users. If you need a higher limit and you don’t want to purchase extra user licenses or upgrade to Performance Edition, you can purchase additional API calls

Bulk API
Submit up to 10,000 batches every 24-hour.
Batch older than 7 days are removed from queue.
Each batch cannot be more than 10Mb in size
Batch can contain a max or 10,000 records

Each batch is divided into chunk of 200records.
Each chunk can take up to 5 mins of processing and total time allowed for complete batch is 10 mins.
If batch takes more than 10 mins its put into queue for later processing, if batch takes more than 10 mins for 10 attempts its marked as failed.
CaseStatus
ContractStatus
KnowledgeArticle
KnowledgeArticleVersion
KnowledgeArticleVersionHistory
KnowledgeArticleViewStat
KnowledgeArticleVoteStat
LeadStatus
OpportunityStage
PartnerRole
RecentlyViewed
SolutionStatus
TaskPriority
UserRecordAccess

Now that we have a high level understanding on the limitation on API's lets consider some common use cases:

Use Case 1: Need to back up object containing a large volume of records (more than 2 million):
Recommendation: Bulk API - Bulk API are generally faster then SOAP and Rest API

Use Case 2: Back up data but also preserve limits regarding number of API calls per 24 hours:
Recommendation: Bulk API - Bulk API do not consume API Calls but consume Bulk API calls. Useful for orgs with less number of user licenses.

Use Case 3: Back up data but preserve bulk API limits:
Recommendation: REST or SOAP API - REST or SOAP API do not consume Bulk API limits however they have there own limitation, Useful for orgs where Bulk API are utilized for other activities.

Use Case 4Backup an object that contains a lot of XML-like information
Recommendation: REST or SOAP API While this is not directly caused by the Salesforce SOAP API, we have seen some XML parsers encountering difficulties when processing the HTTP response (mix of XML-based protocol and XML data)

Use Case 5 Backup an object that is not yet supported by the Bulk API 
Recommendation: REST or SOAP API - Well the objects are not supported in Bulk API

Use Case 6: You need to backup metadata
Recommendation: Metadata API - Well there are not much options, may be you can think of use Tooling API however Tooling API is meant for developing interative application or developer tools. For more details see when to use tooling api


Wednesday, September 14, 2016

Geocoding - Summer 16

Few days back (OK may be months, but who is counting) salesforce came up with Automatic Geocoding. This feature (no points for guessing what it does) allows you to geocode your address fields automatically.

Any limitations?
Like with any new feature Automatic Geocoding is only supported on limited fields such as
  • Billing Address on accounts
  • Shipping Address on accounts
  • Mailing Address on contacts
  • Address on leads

OK, How to get started?
Actually its quite simple:

  1. To enable this just go to Setup, search for ‘Clean Rules' in quick find and click on Clean Rules from the resulting setup.  
  2. Edit one of the four available rules.
  3. Review, Save and Activate. 
  4. Repeat Step 2 and 3 for other rules (if required).
Clean all records setup option


Where and how is this information stored?
Geocodes are added to the pre-existing latitude and longitude fields on accounts, contacts, and leads. Along with latitude and longitude information this feature populates the accuracy field also. Geocoding accuracy is populated as a selection list which has 11 values


Note:
By default, geocode and accuracy fields aren’t visible on records
Geocodes do use data.com technology, but you don't require data.com licenses to use it. So don't sweat.

Tuesday, September 6, 2016

Flows - Simplified

What is Flow, Visual Workflow and Cloud Flow Designer?
All these terms are often used interchangeably, essentially the only difference is Visual Workflow is a product from salesforce that is used to create Flows, the tool that helps us to create these Flows is called Cloud flow designer. Really its that simple. 

OK, So when should we use Visual Workflow?
The easiest way to determine if you need to create Flows is by trying to answer "Do we need users input or interaction?" If yes then probably Visual Workflow is the way. If No then think about using process builder.

Fair Enough, Tell me how to use it?
Lets first familiarize our self with the Cloud flow designer.
Screenshot of the Cloud Flow Designer's user interface with numbers pointing at the button bar, left side panel, and canvas

Cloud flow designer have 3 main components
  • Item 1: The Button bar, You can test your flow using Run, Save your progress, Close and return to Setup and even edit properties.
  • Item 2: The tabs. 
    • The Palette houses all the elements that you can add to your flow.
    • The Resources tab houses all the resources that you can add to your flow.\
    • The Explorer shows all of the elements and resources that you’ve already added to this flow.
  • Item 3: Canvas, A diagrammatic representation of your Flow.
Enough of theory, Lets try something
Lets try to work through the exercise from trail-head, the problem statement says

Create a flow that implements the business process of Account, Contact, and Opportunity data entry and place it on a Visualforce page.

  • The Flow will need to be called 'New Customer Flow'.
  • The Flow should have a screen with fields for First Name, Last Name, Company Name, Opportunity Amount, and Opportunity Stage.
  • The Flow needs to have steps to create an account, a contact, and an opportunity from the data entered.
  • Opportunity name, close date and stage are required fields. Name the Opportunity '{Company Name} - {Last Name}', set the close date to one month from today and set the stage to 'Prospecting'.
  • The Flow should be invoked from a Visualforce page.
  • The Visualforce page should be called FlowPage.
  • The Visualforce page will need a component to reference the 'New Customer Flow' process.


Step 1:
  • Go to Setup. In Quick Find search for Flows.
  • Click on Flows > New Flow
  • In the Cloud Flow Designer > Drag and drop Screen to the Canvas.
  • Provide the information as shown below


Step 2:
  • Click on Add a field and create the fields as shown in the screenshot


  • Click Save to save the work in progress flow


Step 3 and 4:
  • From the Palette drag and drop record create action.
  • Provide the details as mentioned below


Important Steps**
  • Double click on variables in resource tab and create new variable called "account_id" of type text.
  • Edit the Create Account step and assign this variable in the variable option. This step will ensure that your new record id is assigned to a variable which can be later used for associating the contact and opportunity to the account record.

  • From the Palette drag and drop record create action and provide information for contact creation. Repeat the same steps for opportunity creation.


  • Connect all the steps and click run to run a verify the flow.
Step 5, 6, 7:
  • Create a new visual force as shown below.


Please note: This is not a guide to complete trail-head challenge, this blog is meant to give a heads start for those who want to start working on visual workflows.

Friday, September 2, 2016

Winter is coming - Salesforce Winter 17 Release (Top Picks)

Top Pick # 1: Horizontal navigation bar 

Coming winter 17, Salesforce is moving to horizontal navigation bar (menu). By wait, that's not everything. This new horizontal navigation menu comes with some pretty slick bells and whistles.

  • #1: Display the name of app prominently and allow user to switch between apps.
  • #2: Brand your app with a custom logo. This custom logo will appear in two places; (1) Lightning header and (2) App Launcher
  • #3: You can also assign a color to your app's navigation bar. (You won't believe how many times I have received this request from clients)
  • #4: Find complete actions and recently accessed items and lists with a single click (see that little arrow next to tab names)


Sales--Opportunities--header+NOTES.png


As an Admin do I need to do anything?
There are few steps that you would be required to take (you know just to ensure things go smoothly)

  • Review your current apps to verify that each description field contains information that is meaningful to your users. The description fields will be visible to your users in the new App Launcher following the Winter ‘17 release
  • Approximately two weeks before your org is upgraded to Winter ‘17, salesforce will automatically change all navigation menu names to “Lightning.” After this change, we recommend that you modify these temporary names and navigation menu descriptions to the actual names and descriptions you want associated with the Lightning apps that replace the navigation menus. The names you assign are how users will identify the Lightning apps in the user interface.
  • After the Winter ‘17 release, you should edit your apps, to ensure they have the proper name, description, logo, navigation bar color, and other key settings.


Top Pick # 2: Build reusable, invocable process
Yes you guessed this one, this is exactly what it sounds. Now (well after winter 17 release) you can create process that could be invoked by another process. This invocable process can be called from multiple processes or from multiple action group in the same process. 

Input screen to create a new process with updated dropdown menu.

Things to remember:

  • When you create a process that invokes another process, each one counts toward your process and other applicable limits. 
  • DML limits in processes that invoke processes count as one transaction
  • Most importantly, Only processes based on objects that share at least one unique field ID can invoke or be invoked by another process.


Top Pick # 3: Search lightning experience setup with global search - Save few more clicks

Use global search instead of Quick Find to find specific setup records, such as the some picklist or profile. While in Setup, enter the name of the setup record into global search. For example, you want to find a User quickly without browsing through Users so that you can reset the password. On the search results page, use the search scope bar beneath global search to see results only for a specific Setup object.

Search in Setup

Things to remember

  • You must be in Setup to see Setup search results from global search.
  • You can’t search all Setup objects.
  • You can only search by the name of the setup record.
  • You can’t customize which setup record appears in the search scope bar beneath global search.
  • You can’t customize the search layout.
  • You can’t sort or filter results.

Top Pick # 4: Inline editing comes to lightning

Get more done with fewer clicks. Winter 17 is bringing inline edit to lightning, you can also select multiple records from list and accept them or assign campaign members.

Editing Inline in a List View

Things to remember
Inline edit will not work if  

  • The list view contains more than one record type.
  • The list view uses filter logic that contains OR clauses.
  • The list view contains lookup or dependent picklist fields

Top Pick # 5: New look for the app launcher

One of the major updates in terms of user experience, the new and updated app launcher is now better then ever

App Launcher


  • All Apps shows your custom, standard, Lightning Experience, and connected apps in one place. 
  • All Items shows the home page, the feed, tasks, events, objects, custom tab types, and more. These items are independent of the app that shows up on the navigation bar
  • Access the App Launcher by clicking the App Launcher icon (App Launcher icon) on the navigation bar. (see Top Pick # 1)
  • Users can drag and drop apps to reorder them. You can change the default order in which apps appear from the App Manager


Top Pick # 6: Field-Level help in salesforce 1 and lightning experience

To be honest, I always felt that this was an obvious miss in salesforce 1 and lightning experience. Well now we have it and best part is no additional configuration or development is required. Simply view help by hovering over the info icon. Its supported across all browsers and it shows up regardless of your screen size, the data type of the field, or the location of the field in your layout.

Field level help in Lightning Experience


Note: Images/Screenshot taken from release notes.

Thursday, September 1, 2016

Process Builder - Simplified

What is Process Builder?
Process Builder is a workflow tool that helps you easily automate your business processes by providing a powerful and user-friendly graphical representation of your process as you build it.

OK, So what does this means?
In simple terms, process builder is a tool that allows salesforce admins to build some pretty cool automation by simple point and click configurations (well, almost). Automatons that earlier required writing triggers, or series of workflow or combination of workflows, approval and triggers.

Like what, Exactly?
How about
  • Updating a lookup record (Parent), not just the Master-detail, but lookup parent record.
  • Update related (child) records
  • Create a record, yes you heard it right, you can create records.
  • Update a picklist field dynamically and not just predefined selected values
  • Post to Chatter
  • Submit record for Approval (Automatically)

Sweet, So does process builder replaces workflows?
Eventually yes, but for now there are some limitations due to which you might want to use workflows. For eg: Outbound messages are not yet supported in process builders.
Did I said some limitations, I guess meant 1 limitation ;)

Can Process builder replace triggers?
To be honest, I hope someday it would. As of now its not a replacement for triggers, however it can certainly replaces chunks or functionalities from trigger. Remember how many times we have created triggers for trivial automation such as submission of approval process without clicking submit for approval button or create child record or update records. All these functions can now be ported into process builder.

OK I am impressed, now show me how its done?

Process builder Interface has two main components the button bar and canvas.


Button Bar (Item 1)
  • Expand or collapse actions on the canvas
  • Open the process management page
  • Create an inactive copy of the current process (oh did i mentioned that process builder creates versions)
  • Edit or view the properties of the current process
  • Activate or deactivate the current process
Canvas (Item 2)

The canvas is the main work-space for a process. On the canvas, you can define:

  • The records that the process should evaluate (Item 3)
    • You identify the object and specify the changes to that object’s records that cause the process to run.
  • One or more criteria nodes (Item 4)
    • Each criteria node includes conditions that are used to evaluate the record. A criteria node evaluates based on filter criteria or based on a formula. You can also simply execute the associated actions without evaluating the record.
  • One or more actions (Item 5)
    • Create a record 
    • Update any related record—not just the record or its parent
    • Use a quick action to create a record, update a record, or log a call
    • Launch a flow—you can’t schedule this action with workflow
    • Send an email
    • Post to Chatter
    • Submit for approval
  • If the criteria are met for the record that starts the process, the criteria node’s associated action group (Item 6) either executes immediately or according to the schedule defined for the action.