What is Flow, Visual Workflow and Cloud Flow Designer?
All these terms are often used interchangeably, essentially the only difference is Visual Workflow is a product from salesforce that is used to create Flows, the tool that helps us to create these Flows is called Cloud flow designer. Really its that simple.
OK, So when should we use Visual Workflow?
The easiest way to determine if you need to create Flows is by trying to answer "Do we need users input or interaction?" If yes then probably Visual Workflow is the way. If No then think about using process builder.
Fair Enough, Tell me how to use it?
Lets first familiarize our self with the Cloud flow designer.
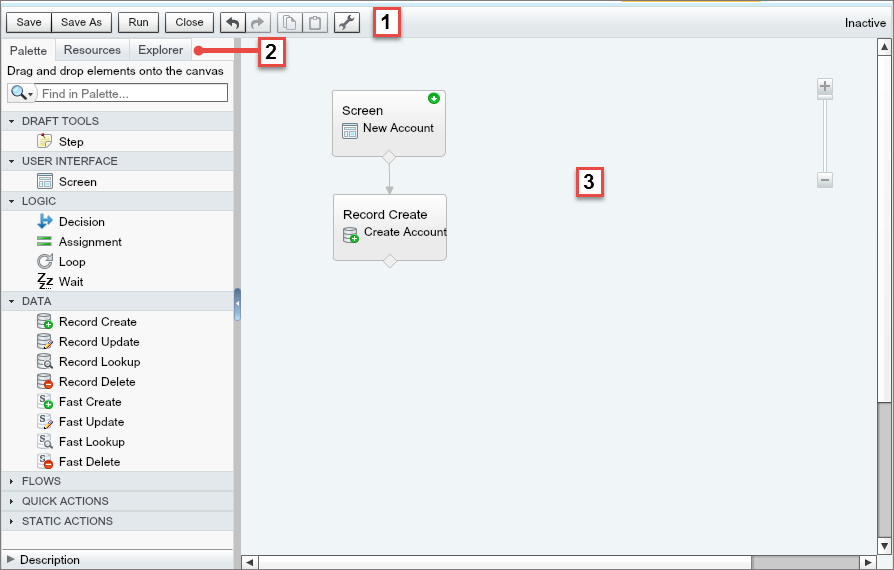
Cloud flow designer have 3 main components


All these terms are often used interchangeably, essentially the only difference is Visual Workflow is a product from salesforce that is used to create Flows, the tool that helps us to create these Flows is called Cloud flow designer. Really its that simple.
OK, So when should we use Visual Workflow?
The easiest way to determine if you need to create Flows is by trying to answer "Do we need users input or interaction?" If yes then probably Visual Workflow is the way. If No then think about using process builder.
Fair Enough, Tell me how to use it?
Lets first familiarize our self with the Cloud flow designer.
Cloud flow designer have 3 main components
- Item 1: The Button bar, You can test your flow using Run, Save your progress, Close and return to Setup and even edit properties.
- Item 2: The tabs.
- The Palette houses all the elements that you can add to your flow.
- The Resources tab houses all the resources that you can add to your flow.\
- The Explorer shows all of the elements and resources that you’ve already added to this flow.
- Item 3: Canvas, A diagrammatic representation of your Flow.
Enough of theory, Lets try something
Lets try to work through the exercise from trail-head, the problem statement says
Create a flow that implements the business process of Account, Contact, and Opportunity data entry and place it on a Visualforce page.
- The Flow will need to be called 'New Customer Flow'.
- The Flow should have a screen with fields for First Name, Last Name, Company Name, Opportunity Amount, and Opportunity Stage.
- The Flow needs to have steps to create an account, a contact, and an opportunity from the data entered.
- Opportunity name, close date and stage are required fields. Name the Opportunity '{Company Name} - {Last Name}', set the close date to one month from today and set the stage to 'Prospecting'.
- The Flow should be invoked from a Visualforce page.
- The Visualforce page should be called FlowPage.
- The Visualforce page will need a component to reference the 'New Customer Flow' process.
Step 1:
- Go to Setup. In Quick Find search for Flows.
- Click on Flows > New Flow
- In the Cloud Flow Designer > Drag and drop Screen to the Canvas.
- Provide the information as shown below


Step 2:
- Click on Add a field and create the fields as shown in the screenshot

- Click Save to save the work in progress flow

Step 3 and 4:
- From the Palette drag and drop record create action.
- Provide the details as mentioned below

Important Steps**
- Double click on variables in resource tab and create new variable called "account_id" of type text.
- Edit the Create Account step and assign this variable in the variable option. This step will ensure that your new record id is assigned to a variable which can be later used for associating the contact and opportunity to the account record.
- From the Palette drag and drop record create action and provide information for contact creation. Repeat the same steps for opportunity creation.


- Connect all the steps and click run to run a verify the flow.
Step 5, 6, 7:
- Create a new visual force as shown below.

Please note: This is not a guide to complete trail-head challenge, this blog is meant to give a heads start for those who want to start working on visual workflows.
No comments:
Post a Comment