Showing posts with label Cloud Flow Designer. Show all posts

Monday, October 17, 2016

Login Flow - Custom Maintenance Notification for Salesforce

Why do I need custom notification?
Many times we need a way to notify user about upcoming planned maintenance or release as soon as they login in. We might also need to broadcast important messages such as change in policies or upcoming events to all our users.

So what is the solution?
If you think about it, the solution is very easy. 
  1. Create a custom object or custom setting to store the notification
  2. Create a visual flow to read the notification stored in custom setting and display it on a screen
  3. Configure login flow to execute the visual flow when a user login
What is login flow?
Login flow provides the ability to build custom business processes and invoke them as users log in. This lets you integrate a custom process with the Salesforce authentication engine, as well as the ability for users to participate in the authentication decision process during the login process.
To be honest, Login flow is nothing new it was introduced in winter '15 release, however it is one of those under-utilized features that not many developer use. 

Detailed Steps:
Step 1: Create a custom object or custom setting to store the notification (we call it Bulletin Board)


Step 2: Create a new Flow (we call it Welcome Notification)

Step 2.1: Create a Fast Lookup element to get the records from Bulletin Board, assign the records to an Sobject Collection Variable (alertList), you can add filters to your lookup condition and also sort the records as per your requirement.


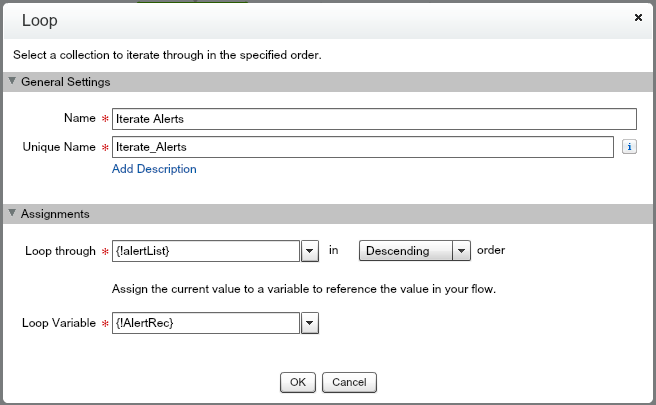
Step 2.2: Create a Loop element to iterate through the records (there could be multiple) and assign them to a Sobject Variable (AlertRec)


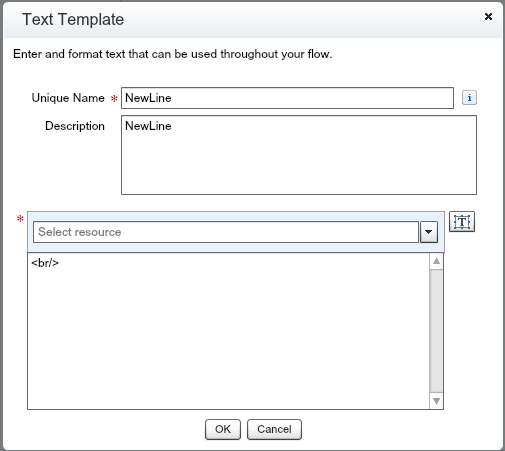
Step 2.3: Create an Assignment element to form the content that you want to display, Create text templates to format your content. I have used Bold Start, Bold End and New Line text templates.




Step 2.4: Create a Screen element to display the content


Step 2.5: Once you done creating these elements, your flow should look like, don't forget to mark your Fast Lookup as start element


Step 3: Create a new Login Flow (we call it Login Message), Select the Visual flow and profiles you want it to be enabled. 


Tip: Assign your Login Flow to a non System admin profile first. An incorrect login flow can lock you out of your org permanently.


Tuesday, September 6, 2016

Flows - Simplified

What is Flow, Visual Workflow and Cloud Flow Designer?
All these terms are often used interchangeably, essentially the only difference is Visual Workflow is a product from salesforce that is used to create Flows, the tool that helps us to create these Flows is called Cloud flow designer. Really its that simple. 

OK, So when should we use Visual Workflow?
The easiest way to determine if you need to create Flows is by trying to answer "Do we need users input or interaction?" If yes then probably Visual Workflow is the way. If No then think about using process builder.

Fair Enough, Tell me how to use it?
Lets first familiarize our self with the Cloud flow designer.
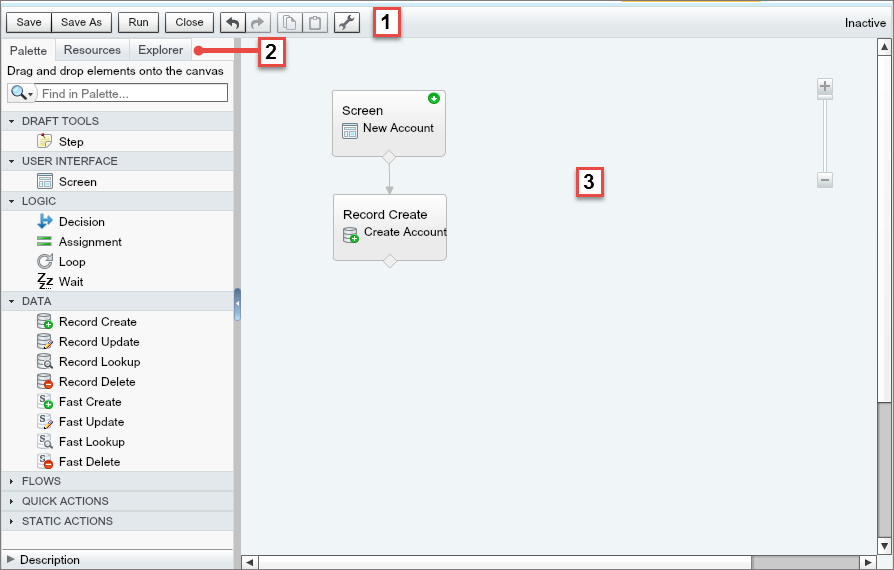
Screenshot of the Cloud Flow Designer's user interface with numbers pointing at the button bar, left side panel, and canvas

Cloud flow designer have 3 main components
  • Item 1: The Button bar, You can test your flow using Run, Save your progress, Close and return to Setup and even edit properties.
  • Item 2: The tabs. 
    • The Palette houses all the elements that you can add to your flow.
    • The Resources tab houses all the resources that you can add to your flow.\
    • The Explorer shows all of the elements and resources that you’ve already added to this flow.
  • Item 3: Canvas, A diagrammatic representation of your Flow.
Enough of theory, Lets try something
Lets try to work through the exercise from trail-head, the problem statement says

Create a flow that implements the business process of Account, Contact, and Opportunity data entry and place it on a Visualforce page.

  • The Flow will need to be called 'New Customer Flow'.
  • The Flow should have a screen with fields for First Name, Last Name, Company Name, Opportunity Amount, and Opportunity Stage.
  • The Flow needs to have steps to create an account, a contact, and an opportunity from the data entered.
  • Opportunity name, close date and stage are required fields. Name the Opportunity '{Company Name} - {Last Name}', set the close date to one month from today and set the stage to 'Prospecting'.
  • The Flow should be invoked from a Visualforce page.
  • The Visualforce page should be called FlowPage.
  • The Visualforce page will need a component to reference the 'New Customer Flow' process.


Step 1:
  • Go to Setup. In Quick Find search for Flows.
  • Click on Flows > New Flow
  • In the Cloud Flow Designer > Drag and drop Screen to the Canvas.
  • Provide the information as shown below


Step 2:
  • Click on Add a field and create the fields as shown in the screenshot


  • Click Save to save the work in progress flow


Step 3 and 4:
  • From the Palette drag and drop record create action.
  • Provide the details as mentioned below


Important Steps**
  • Double click on variables in resource tab and create new variable called "account_id" of type text.
  • Edit the Create Account step and assign this variable in the variable option. This step will ensure that your new record id is assigned to a variable which can be later used for associating the contact and opportunity to the account record.

  • From the Palette drag and drop record create action and provide information for contact creation. Repeat the same steps for opportunity creation.


  • Connect all the steps and click run to run a verify the flow.
Step 5, 6, 7:
  • Create a new visual force as shown below.


Please note: This is not a guide to complete trail-head challenge, this blog is meant to give a heads start for those who want to start working on visual workflows.