Showing posts with label Visualforce. Show all posts

Thursday, October 6, 2016

Dynamic UI in salesforce

Why do I need dynamic UI
Dynamic UI is useful in scenarios where the variation in UI are too large to be handled as field set or by building conditional logic in the code. For eg: A global client has presence in 100+ countries around the global. At the core the sales process has same fundamentals however each country have their own regional nuances such has different data capture requirements, different validations etc.
Solution: Dynamic UI generated at run time.

Recipe for generating dynamic UI
  1. Custom Metadata to store the field details that needs to be displayed
  2. DynamicUIHelper to build the Dynamic Components
  3. VF Page to call Apex:DynamicComponents
  4. Apex Controller to call DynamicUIHelper
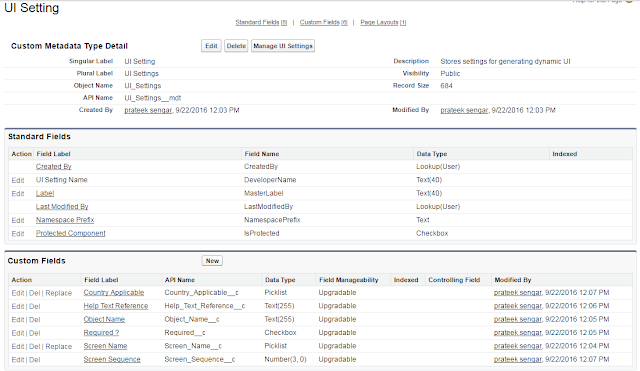
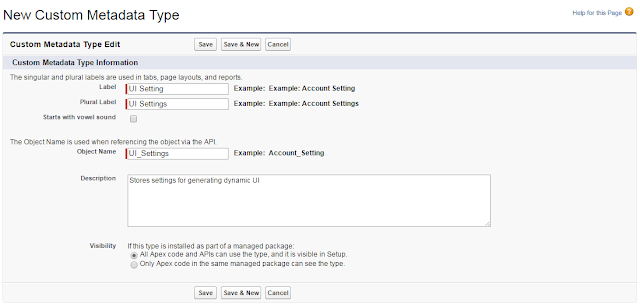
Step 1: Create a custom metadata type (UI Setting) to store the metadata information that would be used to generate the UI

Why custom metadata?
There are two key benefits of using custom metadata type instead of a custom object or custom settings
  1. The query for fetching information from custom metadata are not counted towards SOQL limits for the transaction. 
  2. Apex test class can see values in custom metadata without using "SeeAllData" annotation.
For more details on custom metadata type please refer: Custom Settings vs Custom Metadata


  • Country Applicable: Stores country name for which the fields should be displayed in the UI. You could replace this field with any other fields that defines your filter criteria.
  • Help Text Reference: Allows you to have multiple help text for same field. 
  • Object Name: Stores API Name of custom object where the field resides
  • Required?: If the field should be marked as required in the UI
  • Screen Name: Stores name of the VF Page where the fields will be displayed
  • Screen Sequence: The sequence in which the fields should be added:
Optional:
  • Group Sequence: Could be used to group fields in page sections in the UI
  • Custom Style: Could be used to add a custom style sheet to the fields.
Step 2: Create an Apex class that will read the information stored in the "UI Setting" metadata type and generate UI Components

 public class DynamicUIHelper {  
   Map<String,Schema.SObjectType> gd;  


   //Constructor to initialize variables  
   public DynamicUIHelper()  
   {  
     gd = Schema.getGlobalDescribe();  
   }

 
   /*  
   * Method to generate dynamic UI  
   * Paramters   
   * ScreenName : Screen for which UI needs to be generated  
   * CountryName: Country for which UI needs to be generated  
   * ObjName : Object where data will be stored  
   * prefix: Reference of the Object to be used to bind fields with the object from Controller  
   */  
   public Component.Apex.OutputPanel fetchUI(String screenName,String countryName, String objName, String prefix)  
   {  
     //Declare variable  
     //create an outer panel  
     Component.Apex.OutputPanel opPanel = new Component.Apex.OutputPanel();  
     Map<String,String> fieldAPILabelMap = new Map<String,String>();  
     List<UI_Settings__mdt> fieldInfoList = new List<UI_Settings__mdt>();  
     List<FieldSetWrapper> fsetList = new List<FieldSetWrapper>();  
     //schema defination for the target sObject  
     Schema.SObjectType sobjType = gd.get(objName);   
     Schema.DescribeSObjectResult describeResult = sobjType.getDescribe();   
     Map<String,Schema.SObjectField> fieldsMap = describeResult.fields.getMap();   
     //Iterate through the fieldMap and prepare fieldAPI and fieldLabel   
     for(String fieldName: fieldsMap.keySet())  
     {  
       fieldAPILabelMap.put(fieldName, fieldsMap.get(fieldName).getDescribe().getLabel());  
     }  
     //query information from UI Settings Metadata and create list of wrapper class  
     fieldInfoList = [Select Id,DeveloperName,Country_Applicable__c,Help_Text_Reference__c,  
                 Object_Name__c,Required__c,Screen_Name__c, Screen_Sequence__c,Field_API_Name__c  
              from  UI_Settings__mdt  
              where Screen_Name__c =: screenName AND Object_Name__c =: objName AND Country_Applicable__c =: countryName  
              order by Screen_Sequence__c];  
     for(UI_Settings__mdt uiRec: fieldInfoList)  
     {  
       String fieldLabel;  
       String fieldApi;  
       fieldLabel = fieldAPILabelMap.get(uiRec.Field_API_Name__c);  
       fieldApi = uiRec.Field_API_Name__c;  
       FieldSetWrapper fWrp = new FieldSetWrapper(fieldApi,fieldLabel,uiRec.Required__c,fieldApi);  
       fsetList.add(fWrp);  
     }  
     //add page block section  
     Component.Apex.PageBlockSection pbSec = new Component.Apex.PageBlockSection();  
     pbSec.title = 'Some Title';  
     pbSec.columns = 2;  
     //add the section to opPanel  
     opPanel.childComponents.add(pbSec);  
     for(FieldSetWrapper fw: fsetList)  
     {  
       //create input field  
       Component.Apex.InputField inpField = new Component.Apex.InputField();  
       //assign uique id to element  
       inpField.id = fw.fieldAPI;  
       inpField.label = fw.fieldLabel;  
       //assign value to the input field  
       inpField.expressions.value = '{!'+prefix+'.'+fw.fieldAPI+'}';  
       //create output label for the field  
       Component.Apex.OutputLabel outlbl = new Component.Apex.outputLabel();  
       outlbl.value = fw.fieldLabel;  
       //add label to the input field  
       inpField.childComponents.add(outlbl);  
       //add field to the page block section  
       pbSec.childComponents.add(inpField);  
     }  
     return opPanel;  
   }  


   //wrapper class  
   public class FieldSetWrapper  
   {  
     public String fieldapiname {get;set;}  
     public String fieldLabel {get;set;}  
     public Boolean required {get;set;}  
     public String fieldAPI {get;set;}  
     public FieldSetWrapper(String apiname, String flabel, Boolean req, String ssfieldAPI)  
     {  
       fieldapiname = apiname;  
       fieldLabel = flabel;  
       required = req;  
       fieldAPI = ssfieldAPI;  
     }  
   }  
 }  

Step 3: Create a visualforce page that will call dynamic component


 <apex:page controller="AccountVFController">  
   <apex:form >  
     <apex:pageBlock >  
          <!-- CALL DYNAMIC COMPONENT -->  
       <apex:dynamicComponent componentValue="{!opPanelAccount}"/>  
        </apex:pageBlock>  
   </apex:form>  
 </apex:page>  

Step 4: Create apex controller that will call the helper class and pass the filter parameter countryName, Screen or UI name, SObject where data would be stored and instance of that SObject.


 /*  
 *  Controller for AccountVF  
 *  Author: Prateek Sengar  
 */  
 public class AccountVFController   
 {  
   public transient Component.Apex.OutputPanel opPanelAccount{get; set;}  
   public Account acc{get;set;}  
   //Constructor  
   public AccountVFController()  
   {  
     //call DynamicUIHelper to generate FetchUI  
     DynamicUIHelper DUIRef = new DynamicUIHelper();  
     //get screenName based on your condition  
     String screenName = 'Demo Screen';  
     //get countryName based on your condition  
     String countrName = 'United States of America';  
     //call the method to generate dynamic UI  
     opPanelAccount = DUIRef.fetchUI(screenName ,countrName ,'Account', 'acc');  
   }  
 }  

Thursday, September 22, 2016

Apply lightning design system (LDS) to existing visualforce pages

Disclaimer: General recommendation from salesforce - For existing pages - you don’t try to adapt them to match the visual design of Lightning Experience. There are two reasons for this. First, Lightning Experience is still evolving, and matching its styling yourself means you’re chasing a moving target. That’s work. Second, it’s even more work if you don’t have the tools to do it. In the current release, the tools are mostly not there. We have a number of ideas here and, Safe Harbor, we’re already hard at work at bringing them to you in a future release. So if you can wait, that’s our recommendation.

How to apply LDS to my existing visualforce pages
OK before we start modifying our code, lets first review few things to remember
  • <apex:pageblock> and <apex:inputField> are not supported with LDS, so unless you want your VF pages to be mix of LDS and classic view you need to refactor your code to avoid these elements.
  • If you are planning to use SVG Spritemap icons, add the attribute xmlns="http://www.w3.org/2000/svg" xmlns:xlink="http://www.w3.org/1999/xlink" to the <html> element or the parent <div> element
  • If using SVG spritemap image icons with IE, use the svg4everybody script

Now that we know what to look for lets try it out
First lets consider an existing VF page, this page creates account and contact record.

AccountContactVF

 <apex:page controller="AccountContactController">  
   <!-- ADD SECTION HEADER -->  
   <apex:sectionHeader title="Demo VF Page" subtitle="Create Account and Contact"/>  
   <apex:form >  
   <!-- CREATE PAGE BLOCK -->  
     <apex:pageBlock mode="edit">  
         <!-- SECTION TO CREATE ACCOUNT -->  
         <apex:pageBlockSection title="Account Info" columns="2">  
              <apex:inputField value="{!acc.Name}"></apex:inputField>  
           <apex:inputField value="{!acc.Type}"></apex:inputField>  
           <apex:inputField value="{!acc.ShippingStreet}"></apex:inputField>  
           <apex:inputField value="{!acc.ShippingCity}"></apex:inputField>  
           <apex:inputField value="{!acc.ShippingState}"></apex:inputField>  
           <apex:inputField value="{!acc.ShippingCountry}"></apex:inputField>  
           <apex:inputField value="{!acc.Shippingpostalcode}"></apex:inputField>  
         </apex:pageBlockSection>  
         <!-- SECTION TO CREATE CONTACT -->  
         <apex:pageBlockSection title="Contact Info" columns="2">  
              <apex:inputField value="{!con.FirstName}"></apex:inputField>  
           <apex:inputField value="{!con.LastName}"></apex:inputField>  
           <apex:inputField value="{!con.HomePhone}"></apex:inputField>  
           <apex:inputField value="{!con.MobilePhone}"></apex:inputField>  
         </apex:pageBlockSection>  
         <!-- ADD BUTTONS -->  
         <apex:pageBlockButtons >  
           <apex:commandButton value="Clear"/>  
           <apex:commandButton value="Save" action="{!saveAccCont}"/>  
         </apex:pageBlockButtons>  
     </apex:pageBlock>  
   </apex:form>  
 </apex:page>  


Lets take a quick look at the above VF page, just by looking at the page we can see that for the page to render properly we need make the following changes.

Must Have or Kind Of Must Have Changes:
  • apex:pageblock needs to be replaced with slds-panel
  • apex:inputfield needs to be replaced with apex:inputtext, apex:selectlist etc
  • apex:pageblocksection needs to be replaced with slds-panel__section
  • apex:pageblockbuttons needs to be replaced with a combination of slds-docked-form-footer and slds-button-group
  • Since we would be replacing few apex:inputField with apex:selectlist, we need to update the controller to handle the picklist values.
Optional or Nice To Have Changes:
  • Use slds-form--compound to allow better grouping of fields
  • Use inline icon to stylize text fields
  • Replace apex:pagesectionheader with slds-global-header_container

After making the necessary changes our VF page code will look like:

AccountContactLds

 <apex:page controller="AccountContactController" applyBodyTag="false" docType="html-5.0">  
   <head>  
     <!-- CUSTOM GENERATED STYLE SHEET -->  
     <apex:stylesheet value="{!URLFOR($Resource.SLDS212, 'assets/styles/salesforce-lightning-design-system-vf.css')}" />  
   </head>   
   <body>  
     <!-- REQUIRED SLDS WRAPPER - CUSTOM SCOPING CLASS USED WHEN GENERATING CUSTOM CSS -->  
     <div class="trailhead-lightning">  
       <!-- ADD GLOBAL HEADER -->  
       <header class="slds-global-header_container">  
         <!-- ADD GLOBAL HEADER ICON -->  
         <!-- ADD FLOT AND SPACING TO HAVE BOTH ICON AND TEXT IN SAME LINE -->  
         <div class="slds-col slds-float--left slds-m-right--small">  
           <!-- ADD ICON -->  
           <div class="slds-icon slds-icon_container slds-icon-standard-account slds-icon--medium">  
             <img src="{!URLFOR($Resource.SLDS212,'/assets/icons/standard/account_60.png')}" alt="" />    
           </div>   
         </div>  
         <!-- ADD GLOBAL HEADER TEXT -->  
         <div class="slds-col ">  
           <!-- ADD TEXT -->  
           <div class="slds-page-header__title slds-truncate">  
             Create Account and Contact  
           </div>  
         </div>  
       </header>  
       <!-- ADD PANEL -->  
       <div class="slds-panel slds-grid slds-grid--vertical slds-nowrap slds-form--compound" aria-labelledby="newaccountform">  
         <apex:form >  
           <!-- ADD SECTION GROUPS -->  
           <div class="slds-panel__section">  
             <legend class="slds-form-element__label slds-text-title--caps">ACCOUNT INFO</legend>  
             <div class="form-element__group">  
               <!-- ADD ROW -->  
               <div class="slds-form-element__row">  
                 <!-- ADD FIELDS -->  
                 <div class="slds-form-element">  
                   <apex:outputLabel styleClass="slds-form-element__label">Account Name</apex:outputLabel>  
                   <apex:inputText value="{!acc.Name}" styleClass="slds-form-element__control slds-input"/>  
                 </div>  
                 <div class="slds-form-element">  
                   <apex:outputLabel styleClass="slds-form-element__label">Account Type</apex:outputLabel>  
                   <apex:inputText value="{!acc.Type}" styleClass="slds-form-element__control slds-input"> </apex:inputText>  
                 </div>  
               </div>  
               <!-- ADD ROW -->  
               <div class="slds-form-element__row">  
                 <div class="slds-form-element">  
                   <apex:outputLabel styleClass="slds-form-element__label">Shipping Street</apex:outputLabel>  
                   <apex:inputTextarea value="{!acc.ShippingStreet}" styleClass="slds-form-element__control slds-textarea"/>  
                 </div>  
               </div>  
               <!-- ADD ROW -->  
               <div class="slds-form-element__row">  
                 <div class="slds-form-element">  
                   <apex:outputLabel styleClass="slds-form-element__label">Shipping City</apex:outputLabel>  
                   <apex:inputText value="{!acc.ShippingCity}" styleClass="slds-form-element__control slds-input"/>  
                 </div>  
                 <div class="slds-form-element">  
                   <apex:outputLabel styleClass="slds-form-element__label">Shipping State</apex:outputLabel>  
                   <apex:inputText value="{!acc.ShippingState}" styleClass="slds-form-element__control slds-input"/>  
                 </div>  
               </div>  
               <!-- ADD ROW -->  
               <div class="slds-form-element__row">  
                 <div class="slds-form-element">  
                   <apex:outputLabel styleClass="slds-form-element__label">Shipping Country</apex:outputLabel>  
                   <apex:selectList value="{!acc.ShippingCountry}" styleClass="slds-form-element__control slds-select slds-select_container" size="1">  
                        <apex:selectOptions value="{!countryList}"></apex:selectOptions>  
                   </apex:selectList>  
                 </div>  
                 <div class="slds-form-element">  
                   <apex:outputLabel styleClass="slds-form-element__label">Shipping Postal Code</apex:outputLabel>  
                   <apex:inputText value="{!acc.ShippingPostalCode}" styleClass="slds-form-element__control slds-input"/>  
                 </div>  
               </div>  
              </div>  
           </div>  
           <!-- SECTION GROUP ENDS-->  
           <!-- ADD SECTION GROUPS -->  
           <div class="slds-panel__section">  
             <legend class="slds-form-element__label slds-text-title--caps">CONTACT INFO</legend>  
             <div class="form-element__group">  
               <!-- ADD ROW -->  
               <div class="slds-form-element__row">  
                 <div class="slds-form-element">  
                   <apex:outputLabel styleClass="slds-form-element__label">First Name</apex:outputLabel>  
                   <apex:inputText value="{!con.FirstName}" styleClass="slds-form-element__control slds-input"/>  
                 </div>  
                 <div class="slds-form-element">  
                   <apex:outputLabel styleClass="slds-form-element__label">  
                     <abbr class="slds-required" title="required">*</abbr>   
                     Last Name  
                   </apex:outputLabel>  
                   <apex:inputText value="{!con.LastName}" styleClass="slds-form-element__control slds-input"/>  
                 </div>  
               </div>  
               <!-- ADD ROW -->  
               <div class="slds-form-element__row" xmlns="http://www.w3.org/2000/svg" xmlns:xlink="http://www.w3.org/1999/xlink">  
                 <div class="slds-form-element">  
                   <apex:outputLabel styleClass="slds-form-element__label">Phone Number</apex:outputLabel>  
                   <div class="slds-form-element__control slds-input-has-icon slds-input-has-icon--left">  
                     <svg aria-hidden="true" class="slds-input__icon">  
                      <use xlink:href="{!URLFOR($Resource.SLDS212,'/assets/icons/utility-sprite/svg/symbols.svg#call')}"></use>  
                     </svg>  
                     <apex:inputText value="{!con.HomePhone}" styleClass="slds-input" html-placeholder="(333) 333-3333"/>  
                   </div>  
                 </div>  
                 <div class="slds-form-element">  
                   <apex:outputLabel styleClass="slds-form-element__label">Mobile Number</apex:outputLabel>  
                   <apex:inputText value="{!con.MobilePhone}" styleClass="slds-form-element__control slds-input" html-placeholder="(444) 444-4444"/>  
                 </div>  
               </div>  
             </div>  
           </div>  
           <!-- FOOTER -->  
           <div class="slds-panel__section">  
             <div class="slds-docked-form-footer slds-button-group slds-float--right" role="group">  
               <apex:commandButton value="Clear" styleClass="slds-button slds-button--neutral"/>  
                     <apex:commandButton value="Save" action="{!saveAccCont}" styleClass="slds-button slds-button--brand"/>  
             </div>  
           </div>  
         </apex:form>  
       </div>  
     </div>  
   </body>  
 </apex:page>  

Supporting Apex Controller

 public class AccountContactController {  
   public Account acc{get;set;}  
   public Contact con{get;set;}  
   public AccountContactController()  
   {  
     acc = new Account();  
     con = new Contact();  
   }  
   public pageReference saveAccCont()  
   {  
     PageReference pg = null;  
     if(acc != null)  
     {  
       insert acc;  
       if(con != null && acc.Id != null)  
       {  
         con.AccountId = acc.Id;  
         insert con;  
         pg = new PageReference('/'+acc.Id);  
         return pg;  
       }  
       else  
       {  
         return pg;  
       }  
     }  
     else  
     {  
          return pg;  
     }  
   }  
   public List<SelectOption> getCountryList()  
   {  
     List<SelectOption> countryList = new List<SelectOption>();  
     countryList.add(new SelectOption('US','US'));  
     countryList.add(new SelectOption('CANADA','CANADA'));  
     countryList.add(new SelectOption('MEIXCO','MEIXCO'));  
     return countryList;  
   }  
 }  

Output
As you can see its quite a bit of work to apply lds to existing VF pages. However if you want to align the look and feel of your VF pages with lightning experience its well worth it.

Screenshots
Classic VF Page
LDS VF Page