Monday, October 17, 2016

Login Flow - Custom Maintenance Notification for Salesforce

Why do I need custom notification?
Many times we need a way to notify user about upcoming planned maintenance or release as soon as they login in. We might also need to broadcast important messages such as change in policies or upcoming events to all our users.

So what is the solution?
If you think about it, the solution is very easy. 
  1. Create a custom object or custom setting to store the notification
  2. Create a visual flow to read the notification stored in custom setting and display it on a screen
  3. Configure login flow to execute the visual flow when a user login
What is login flow?
Login flow provides the ability to build custom business processes and invoke them as users log in. This lets you integrate a custom process with the Salesforce authentication engine, as well as the ability for users to participate in the authentication decision process during the login process.
To be honest, Login flow is nothing new it was introduced in winter '15 release, however it is one of those under-utilized features that not many developer use. 

Detailed Steps:
Step 1: Create a custom object or custom setting to store the notification (we call it Bulletin Board)


Step 2: Create a new Flow (we call it Welcome Notification)

Step 2.1: Create a Fast Lookup element to get the records from Bulletin Board, assign the records to an Sobject Collection Variable (alertList), you can add filters to your lookup condition and also sort the records as per your requirement.


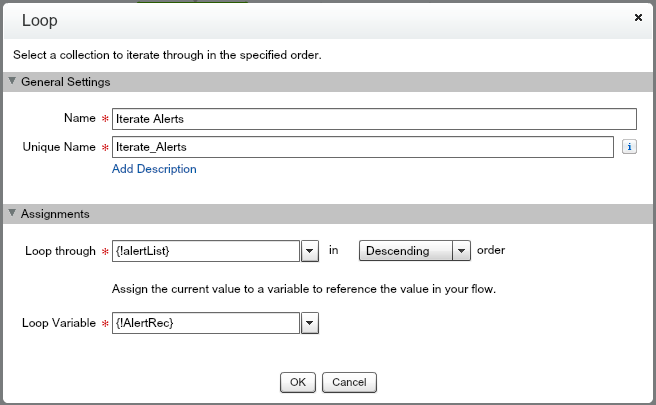
Step 2.2: Create a Loop element to iterate through the records (there could be multiple) and assign them to a Sobject Variable (AlertRec)


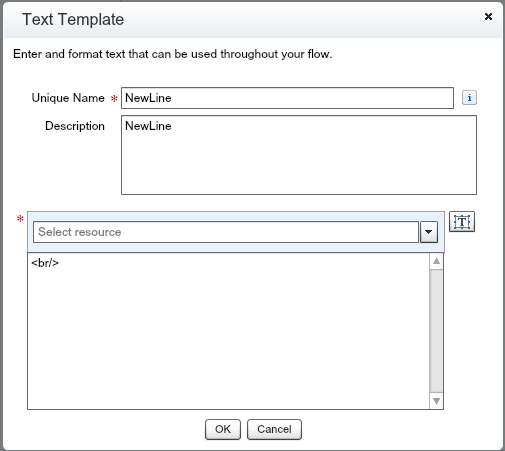
Step 2.3: Create an Assignment element to form the content that you want to display, Create text templates to format your content. I have used Bold Start, Bold End and New Line text templates.


Step 2.4: Create a Screen element to display the content


Step 2.5: Once you done creating these elements, your flow should look like, don't forget to mark your Fast Lookup as start element


Step 3: Create a new Login Flow (we call it Login Message), Select the Visual flow and profiles you want it to be enabled. 


Tip: Assign your Login Flow to a non System admin profile first. An incorrect login flow can lock you out of your org permanently.


Thursday, October 6, 2016

Dynamic UI in salesforce

Why do I need dynamic UI
Dynamic UI is useful in scenarios where the variation in UI are too large to be handled as field set or by building conditional logic in the code. For eg: A global client has presence in 100+ countries around the global. At the core the sales process has same fundamentals however each country have their own regional nuances such has different data capture requirements, different validations etc.
Solution: Dynamic UI generated at run time.

Recipe for generating dynamic UI
  1. Custom Metadata to store the field details that needs to be displayed
  2. DynamicUIHelper to build the Dynamic Components
  3. VF Page to call Apex:DynamicComponents
  4. Apex Controller to call DynamicUIHelper
Step 1: Create a custom metadata type (UI Setting) to store the metadata information that would be used to generate the UI

Why custom metadata?
There are two key benefits of using custom metadata type instead of a custom object or custom settings
  1. The query for fetching information from custom metadata are not counted towards SOQL limits for the transaction. 
  2. Apex test class can see values in custom metadata without using "SeeAllData" annotation.
For more details on custom metadata type please refer: Custom Settings vs Custom Metadata


  • Country Applicable: Stores country name for which the fields should be displayed in the UI. You could replace this field with any other fields that defines your filter criteria.
  • Help Text Reference: Allows you to have multiple help text for same field. 
  • Object Name: Stores API Name of custom object where the field resides
  • Required?: If the field should be marked as required in the UI
  • Screen Name: Stores name of the VF Page where the fields will be displayed
  • Screen Sequence: The sequence in which the fields should be added:
Optional:
  • Group Sequence: Could be used to group fields in page sections in the UI
  • Custom Style: Could be used to add a custom style sheet to the fields.
Step 2: Create an Apex class that will read the information stored in the "UI Setting" metadata type and generate UI Components

 public class DynamicUIHelper {  
   Map<String,Schema.SObjectType> gd;  


   //Constructor to initialize variables  
   public DynamicUIHelper()  
   {  
     gd = Schema.getGlobalDescribe();  
   }

 
   /*  
   * Method to generate dynamic UI  
   * Paramters   
   * ScreenName : Screen for which UI needs to be generated  
   * CountryName: Country for which UI needs to be generated  
   * ObjName : Object where data will be stored  
   * prefix: Reference of the Object to be used to bind fields with the object from Controller  
   */  
   public Component.Apex.OutputPanel fetchUI(String screenName,String countryName, String objName, String prefix)  
   {  
     //Declare variable  
     //create an outer panel  
     Component.Apex.OutputPanel opPanel = new Component.Apex.OutputPanel();  
     Map<String,String> fieldAPILabelMap = new Map<String,String>();  
     List<UI_Settings__mdt> fieldInfoList = new List<UI_Settings__mdt>();  
     List<FieldSetWrapper> fsetList = new List<FieldSetWrapper>();  
     //schema defination for the target sObject  
     Schema.SObjectType sobjType = gd.get(objName);   
     Schema.DescribeSObjectResult describeResult = sobjType.getDescribe();   
     Map<String,Schema.SObjectField> fieldsMap = describeResult.fields.getMap();   
     //Iterate through the fieldMap and prepare fieldAPI and fieldLabel   
     for(String fieldName: fieldsMap.keySet())  
     {  
       fieldAPILabelMap.put(fieldName, fieldsMap.get(fieldName).getDescribe().getLabel());  
     }  
     //query information from UI Settings Metadata and create list of wrapper class  
     fieldInfoList = [Select Id,DeveloperName,Country_Applicable__c,Help_Text_Reference__c,  
                 Object_Name__c,Required__c,Screen_Name__c, Screen_Sequence__c,Field_API_Name__c  
              from  UI_Settings__mdt  
              where Screen_Name__c =: screenName AND Object_Name__c =: objName AND Country_Applicable__c =: countryName  
              order by Screen_Sequence__c];  
     for(UI_Settings__mdt uiRec: fieldInfoList)  
     {  
       String fieldLabel;  
       String fieldApi;  
       fieldLabel = fieldAPILabelMap.get(uiRec.Field_API_Name__c);  
       fieldApi = uiRec.Field_API_Name__c;  
       FieldSetWrapper fWrp = new FieldSetWrapper(fieldApi,fieldLabel,uiRec.Required__c,fieldApi);  
       fsetList.add(fWrp);  
     }  
     //add page block section  
     Component.Apex.PageBlockSection pbSec = new Component.Apex.PageBlockSection();  
     pbSec.title = 'Some Title';  
     pbSec.columns = 2;  
     //add the section to opPanel  
     opPanel.childComponents.add(pbSec);  
     for(FieldSetWrapper fw: fsetList)  
     {  
       //create input field  
       Component.Apex.InputField inpField = new Component.Apex.InputField();  
       //assign uique id to element  
       inpField.id = fw.fieldAPI;  
       inpField.label = fw.fieldLabel;  
       //assign value to the input field  
       inpField.expressions.value = '{!'+prefix+'.'+fw.fieldAPI+'}';  
       //create output label for the field  
       Component.Apex.OutputLabel outlbl = new Component.Apex.outputLabel();  
       outlbl.value = fw.fieldLabel;  
       //add label to the input field  
       inpField.childComponents.add(outlbl);  
       //add field to the page block section  
       pbSec.childComponents.add(inpField);  
     }  
     return opPanel;  
   }  


   //wrapper class  
   public class FieldSetWrapper  
   {  
     public String fieldapiname {get;set;}  
     public String fieldLabel {get;set;}  
     public Boolean required {get;set;}  
     public String fieldAPI {get;set;}  
     public FieldSetWrapper(String apiname, String flabel, Boolean req, String ssfieldAPI)  
     {  
       fieldapiname = apiname;  
       fieldLabel = flabel;  
       required = req;  
       fieldAPI = ssfieldAPI;  
     }  
   }  
 }  

Step 3: Create a visualforce page that will call dynamic component


 <apex:page controller="AccountVFController">  
   <apex:form >  
     <apex:pageBlock >  
          <!-- CALL DYNAMIC COMPONENT -->  
       <apex:dynamicComponent componentValue="{!opPanelAccount}"/>  
        </apex:pageBlock>  
   </apex:form>  
 </apex:page>  

Step 4: Create apex controller that will call the helper class and pass the filter parameter countryName, Screen or UI name, SObject where data would be stored and instance of that SObject.


 /*  
 *  Controller for AccountVF  
 *  Author: Prateek Sengar  
 */  
 public class AccountVFController   
 {  
   public transient Component.Apex.OutputPanel opPanelAccount{get; set;}  
   public Account acc{get;set;}  
   //Constructor  
   public AccountVFController()  
   {  
     //call DynamicUIHelper to generate FetchUI  
     DynamicUIHelper DUIRef = new DynamicUIHelper();  
     //get screenName based on your condition  
     String screenName = 'Demo Screen';  
     //get countryName based on your condition  
     String countrName = 'United States of America';  
     //call the method to generate dynamic UI  
     opPanelAccount = DUIRef.fetchUI(screenName ,countrName ,'Account', 'acc');  
   }  
 }