Wednesday, December 28, 2016

Spring 17 - First Look

Starting from Jan 6th sandboxes will be upgraded to preview instance so that you can play around and get ready for the new and upcoming features. 
So far, based on the Spring 17 release note here are some of the top features that I am looking forward to:

Create Shortcuts to Your Top Salesforce Pages with Favorites
Favorites let you quickly access important records, lists, groups, dashboards, and other frequently used pages in Salesforce. They’re similar to bookmarks in a web browser but better because your favorites are available no matter which device or browser you use to log into Lightning Experience.

See the Kanban View Everywhere
Kanban view which allows you to display records visually is now available for all objects (Almost). You can also see Kanban view by record types. The record types will appear as sub-tabs and you can easily filter by clicking on the sub-tabs.

Save Time by Editing Inline in List Views (Generally Available)
Reps can get more done with fewer clicks when working from list views. Edit record values directly in a list view now that inline edit is generally available. And when you visit an object home page, the last list view you worked with is now the one that displays. Also Inline editing is now available for communities.

Use the Lightning Design System in Visualforce Pages
Use the <apex:slds> element to incorporate the Lightning Design System in your Visualforce pages and align them with the styling of Lightning Experience. This component is a streamlined alternative to uploading the Lightning Design System as a static resource and using it in your Visualforce pages.

Because you don’t have to upload the Lightning Design System as a static resource, you can keep the syntax of your page simple and stay under the 250-MB static resource limit. To use Lightning Design System stylesheets in your Visualforce page, add <apex:slds /> anywhere in your page markup.

Assign Record Pages by App, Record Type, and Profile
Now you can customize your users’ experience even more granularly by creating custom record pages and assigning them by app, record type, and user profile. You can now activate a page as the org default, app default, or for the most granularity, assign it to a combination of apps, record types, and profiles all in one place

Add the Related List Component to Your Lightning Pages
Instead of displaying all the related lists for a record, you now get to pick exactly which list you want with the new Related List component in lightning experience.

Web-to-Lead: reCAPTCHA Web Form Validation
Add reCAPTCHA to your Web-to-Case form to make it easy for customers to contact your company while making it difficult for spambots to waste service agents’ time. The reCAPTCHA widget requires customers to select a checkbox before they can create a case. Enabling spam filtering lets customer service agents focus on resolving real customer issues, and not on spam cases

Add Salesforce Files to a Record from the Related List in Lightning Experience
Increase productivity by attaching Salesforce Files to a record, right from the files card. You can attach Files Connect files and library files too.

Add Skype to Lightning Record Pages (Beta)
A new Skype for Business component is available for the Lightning App Builder. Add it to your record pages to get Skype controls that let you see who's online, initiate audio and video calls, and chat

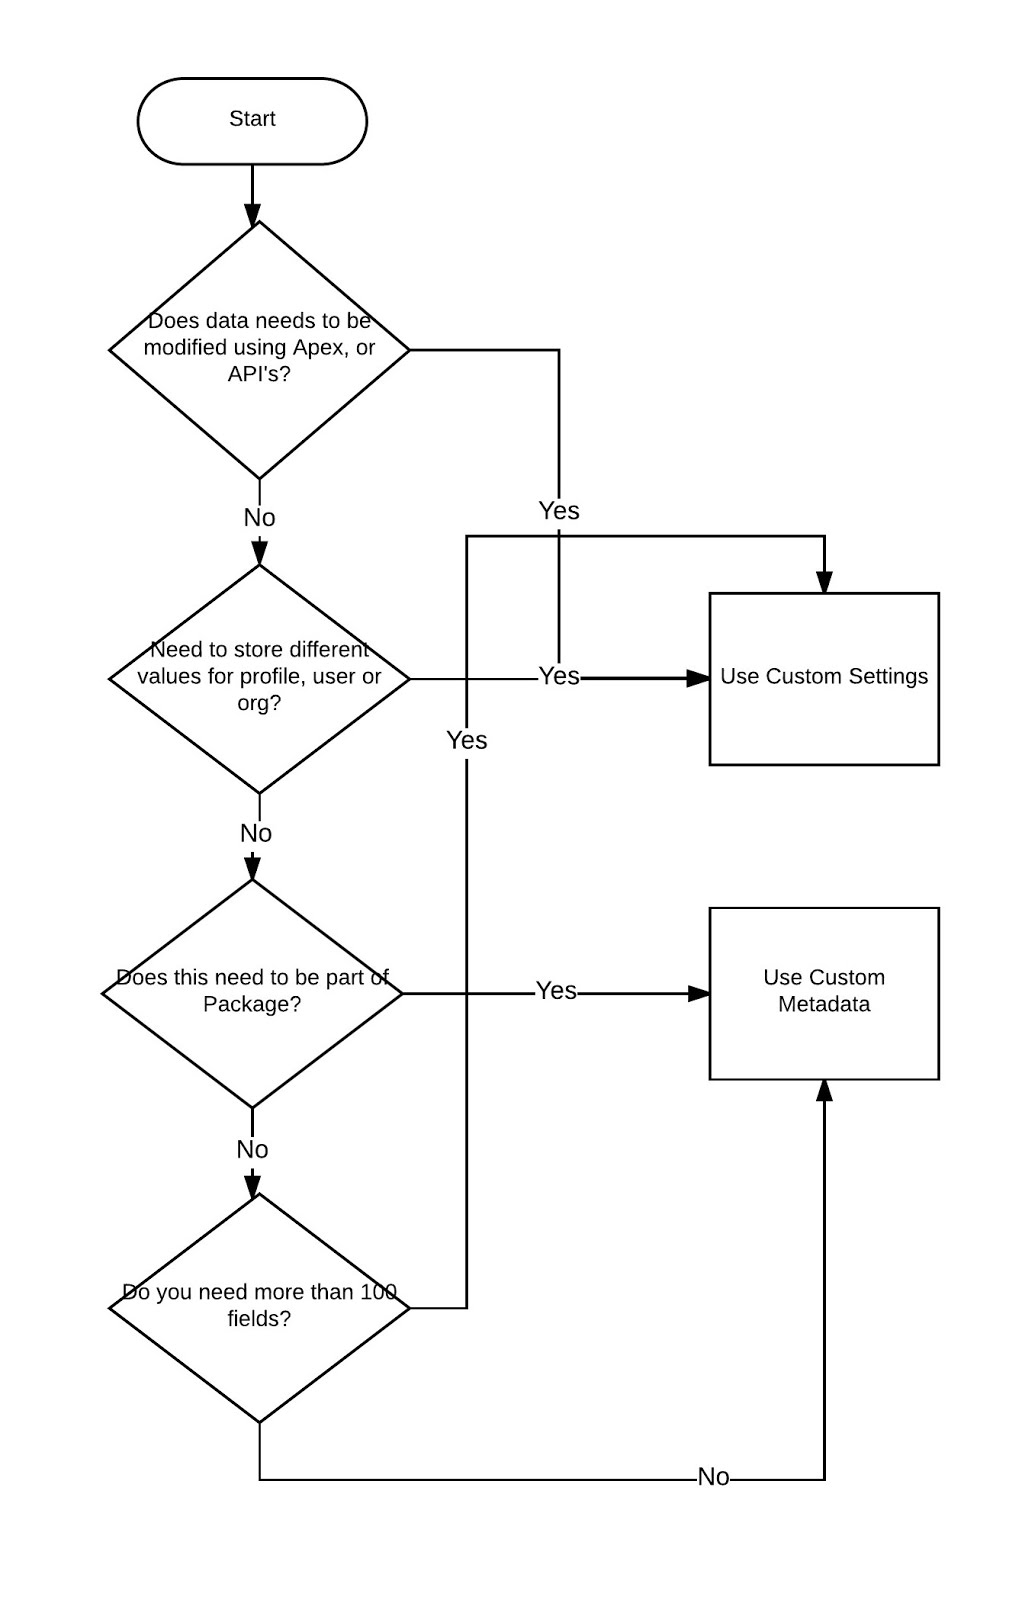
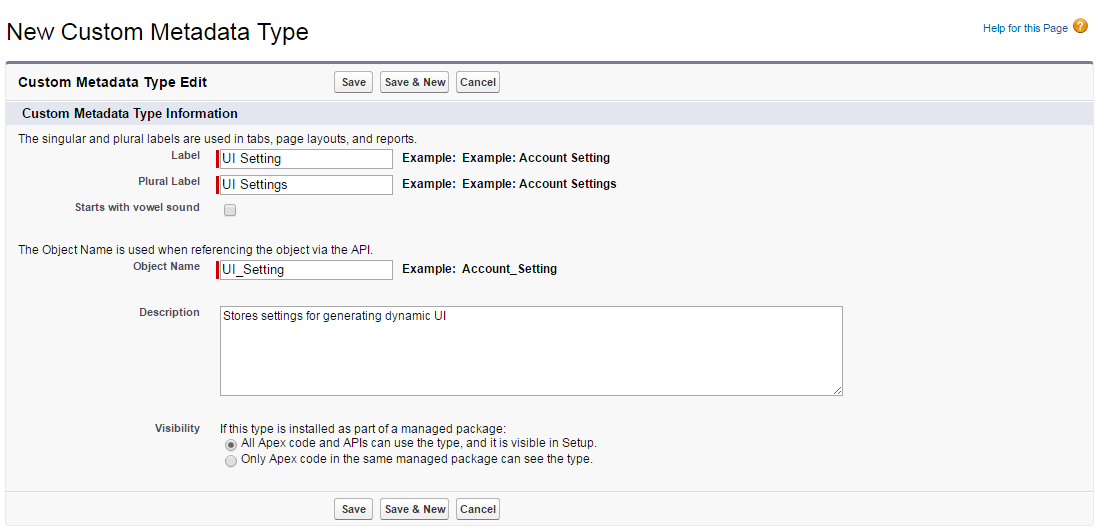
Relationship Field Enhancements, Long Text Areas in Custom Metadata Type (Beta)
Build better apps than ever before with custom metadata types which let you base your apps on types of metadata rather than just data. Do even more with the features you’ve been waiting for, including metadata relationships to field definitions and long text areas in custom metadata types.

External Services: Connect to Salesforce Using a Wizard, Schema, and Flow (Beta)
Use External Services to connect your Salesforce org to a service (REST API) of your choice. Invoke methods based on the external source via a flow. Import data from the service into Salesforce. You can do all this with the help of an easy-to-use wizard.

Maps of Populated SObject Fields Return Correct Values
Prior to Srping release SObject.getPopulatedFieldsAsMap() method would not return fields that were added to an sObject after it has been retrieved via SOQL. This bug made the utility of this method very limited. The good news is this bug is now fixed and this method will now returns a map of populated field names and their corresponding values.

Reports and Dashboards REST API
Reports and Dashboards REST API enhancements include new a new resource describing report types, lets you create reports and delete report instances, and includes analytics notifications for report subscriptions in Lightning Experience.

Wednesday, November 23, 2016

Best practices and desing patterns for declarative development

As we all know that salesforce provides a rich set of declarative development features such as validation rules, workflows, process builders etc. These declarative features are optimized to work with the force.com architecture and provides us with some default degree of SOC. Having said that as an admin / developer there are few best practices or patterns that you can introduce in your declarative development. 

Make your validation rules, process builders and workflows mutable by design

Having Validation Rules, Workflow and Process builders in your Salesforce org is a great way to implement your business process. However, I can think of more than one scenario where ValidationWorkflow Rules and Process builders can get in your way. To avoid such scenarios always ensure that your declarative components are mutable by design
.

Step 1: Create a hierarchy custom setting


Step 2: Create custom field (checkbox) for each validation rules, If your organization has more than 300 validation rules, you should create 1 custom setting per object.


Step 3: Update validation rules to By Pass based on the value in custom setting


Step 4: When you want to bypass a validation rule, create a record in the custom setting. You can create record for a user or profile or at org level.


Step 5: The same logic can be applied to workflow rules and process builders.

Filter based on record type

If you have record types enabled for objects, always ensure that your validation rules, workflows, process builders and approval process are filters on record type name. Even if the process is global and applicable to all record types its recommended to apply record type filters. This will ensure that any future development or expansion in your org will not impact your existing codes.

Sample: Add RecordType.DeveloperName check after your user/profile bypass check


Add more focus to your declarative components

Ensure that the entry criteria is narrowed down to the relevant events. For eg: Validation rules are executed every-time a record is created or modified, its recommended to narrow down the scope to change in values of the relevant fields.

Sample: Add isNew() isChanged(Field Name) check after record type check.


Tuesday, November 8, 2016

Lightning Component Framework - Approval History Lightning Component


What is Lightning Component Framework?
Simply put Lightning Components is a UI framework for developing dynamic and responsive web apps for mobile and desktop device. Like any other app framework Lightning Components is also collection of codes and services at both client side and server side.


What consists of Lightning Components?
Lightning component bundle mainly consists of the below resources


Is Lightning going to replace Visualforce?
As far as we know, Visualforce is not going away (Atleast not in the near future). Visualforce provides the mechanism for delivering template-driven web pages and email messages. In addition, developers wishing to simply utilize a basic container and maintain more control over the lifecycle of the request may still choose visualforce.

For more detailed comparison click here 

Lets see some example 
Use Case: Record page component to display approval history 

Apex Class: ApprovalComponentController

 public class ApprovalComponentController {  
       /*  
       * This method will be called by the helper function  
       * Parameter: recordId  
       * Returns: instance of wrapper class  
       */  
   @AuraEnabled  
   public static ApprovalList getApprovalData(Id recId)  
   {  
     Id recordId = recId;  
     ApprovalList approvalResultForObject = new ApprovalList();  
     List<ApprovalStepWrapper> aSW = new List<ApprovalStepWrapper>();  
     String recallApprovalProcessLink;  
     Boolean isSubmitForApproval = true;  
     for(ProcessInstance pI: getProcessHistory(recordId).values())  
     {  
       Map<Id,List<ProcessInstanceHistory>> mapOfProcessNodeIdAndProcessInstanceHistory = new Map<Id,List<ProcessInstanceHistory>>();  
       Set<Id> processNodeId= new Set<Id>();  
       for(ProcessInstanceHistory sWI:pI.StepsAndWorkitems)  
       {  
         if(processNodeId.size() ==0)  
           processNodeId.add(sWI.ProcessNodeId);  
         else if(processNodeId.size()>0 && processNodeId.contains(sWI.ProcessNodeId)!= NULL)  
           processNodeId.add(sWI.ProcessNodeId);  
       }  
       for(Id pNId: processNodeId)  
       {  
         ApprovalStepWrapper aSWr = new ApprovalStepWrapper();  
         for(ProcessInstanceHistory sWI:pI.StepsAndWorkitems)  
         {  
           if(sWI.processNodeId == pNID)  
           {  
             aSWr.listOfSteps.add(new ApprovalHistoryWrap(sWI.CreatedDate, sWI.OriginalActor.Name, sWI.StepStatus,sWI.Actor.Name));  
           }  
           if(sWI.StepStatus == 'Pending')  
           {  
             isSubmitForApproval = false;  
           }  
         }  
         aSW.add(aSWr);  
       }  
     }  
     approvalResultForObject.approvals = aSW;  
     approvalResultForObject.recordId = recordId;  
     approvalResultForObject.isSubmitForApproval = isSubmitForApproval;  
     system.debug('asw'+aSW);  
     return approvalResultForObject;  
   }  
   /*  
    * This method queries the processinstance and workitem for the record  
    * Parameter: Record ID   
    * Returns: Map of all processinstance related to the record id  
    */  
   @AuraEnabled  
   public static Map<Id,ProcessInstance> getProcessHistory(Id objectId)  
   {  
     return new Map<Id,ProcessInstance>([SELECT Id, (SELECT ID, ProcessNodeId,  
                             StepStatus,Comments,TargetObjectId,ActorId,CreatedById,IsDeleted,IsPending  
                             ,OriginalActorId,ProcessInstanceId,RemindersSent,CreatedDate, Actor.Name,  
                             OriginalActor.Name , ProcessNode.Name FROM StepsAndWorkitems order by CreatedDate DESC )   
                       FROM ProcessInstance where TargetObjectId =:objectId order by CreatedDate DESC]);  
   }  
   /*  
    * Wrapper class  
    */  
   public class ApprovalStepWrapper{  
     @AuraEnabled  
     public List<ApprovalHistoryWrap> listOfSteps {get;set;}  
     public ApprovalStepWrapper(){  
       listOfSteps = new List<ApprovalHistoryWrap>();  
     }  
   }  
        /*  
    * Wrapper class  
    */  
   public class ApprovalHistoryWrap  
   {  
     @AuraEnabled  
     public Date createdDate {get;set;}  
     @AuraEnabled  
     public string actorName {get;set;}  
     @AuraEnabled  
     public string steps {get;set;}  
     @AuraEnabled  
     public string assignedTo {get;set;}  
     public ApprovalHistoryWrap(DateTime crDate, string name, string stp, string actor)  
     {  
       createdDate = crDate.date();  
       actorName = name;  
       steps = stp;  
       assignedTo = actor;  
     }  
   }  
   /*  
    * Wrapper class  
    */  
   public class ApprovalList  
   {   
     @AuraEnabled  
     public List<ApprovalStepWrapper> approvals {get;set;}  
     @AuraEnabled    
     public Boolean isSubmitForApproval {get;set;}  
     @AuraEnabled  
     public Id recordId {get;set;}  
     public ApprovalList(){  
       approvals = new List<ApprovalStepWrapper>();  
       isSubmitForApproval = true;  
     }  
   }  
 }  


Highlights:
@AuraEnabled: The @AuraEnabled annotation enables client- and server-side access to an Apex controller method. Using this annotation makes your method visible to your lightning components.

Access wrapper class in lightning component: To access properties of your Wrapper class in your lightning component using @AuraEnabled annotation.


Lightning component: ApprovalListComp

 <aura:component controller="ApprovalComponentController" implements="force:appHostable,flexipage:availableForAllPageTypes,flexipage:availableForRecordHome,force:hasRecordId" access="global" >  
      <aura:attribute name="recordId" type="Id"/>  
   <aura:handler name="init" value="{!this}" action="{!c.doInit}" />  
   <aura:attribute name="approvalList" type="object"/>  
   <ltng:require styles="{!$Resource.SLDS+'/assets/styles/salesforce-lightning-design-system-ltng.css'}" />  
   <!-- WRAPPER DIV -->  
   <div class="wk_static">  
     <!-- BODY -->  
     <div class="slds-scrollable" style="height: 300px;">  
       <table class="slds-table slds-table--bordered slds-max-medium-table--stacked">  
         <thead>  
           <tr class="slds-text-title--caps">  
             <th scope="col" >  
               <div class="slds-truncate" title="Date">Date</div>  
             </th>  
             <th scope="col" >  
               <div class="slds-truncate" title="Status">Status</div>  
             </th>  
             <th scope="col" >  
               <div class="slds-truncate" title="Assigned To">Assigned To</div>  
             </th>  
             <th scope="col" >  
               <div class="slds-truncate" title="Approver">Approver</div>  
             </th>  
           </tr>  
         </thead>  
         <tbody>  
           <!-- aura equivalent of apex:repeat -->  
           <aura:iteration items="{!v.approvalList.approvals}" var="appRec">   
             <aura:iteration items="{!appRec.listOfSteps}" var="step">  
               <tr >  
                 <td data-label="Date">  
                   <div class="slds-truncate" title="Date">{!step.createdDate}</div>  
                 </td>  
                 <td data-label="Status">  
                   <div class="slds-truncate" title="Status">{!step.steps}</div>  
                 </td>  
                 <td data-label="Assigned To">  
                   <div class="slds-truncate" title="Assigned To">{!step.assignedTo}</div>  
                 </td>  
                 <td data-label="Approver">  
                   <div class="slds-truncate" title="Approver">{!step.actorName}</div>  
                 </td>  
               </tr>  
             </aura:iteration>  
           </aura:iteration>   
         </tbody>  
       </table>  
     </div>  
   </div>  
 </aura:component>  

Highlights:
force:hasRecordId: The interface indicates the current record ID should be injected in the component's recordId attribute

<aura:iteration>: <aura:iteration> iterates over a collection of items and renders the body of the tag for each item. Data changes in the collection are re-rendered automatically on the page. aura:iteration supports iterations containing components that have server-side dependencies or that can be created exclusively on the client-side

JS Controller

 ({  
      doInit : function(component, event, helper) {  
           helper.getApprovalList(component);  
      }  
 })  

Highlights
helper.getApprovalList:  Calls helper function from a client-side controller functionHelper functions are local to a component, improve code reuse, and move the heavy lifting of JavaScript logic away from the client-side controller where possible.


JS Helper

 ({  
      getApprovalList : function(component) {  
     var action = component.get("c.getApprovalData");  
     action.setParams({  
       recId: component.get("v.recordId")  
     });  
     action.setCallback(this, function(a) {  
         component.set("v.approvalList", a.getReturnValue());  
       });  
     $A.enqueueAction(action);  
      }  
 })  


Monday, October 17, 2016

Login Flow - Custom Maintenance Notification for Salesforce

Why do I need custom notification?
Many times we need a way to notify user about upcoming planned maintenance or release as soon as they login in. We might also need to broadcast important messages such as change in policies or upcoming events to all our users.

So what is the solution?
If you think about it, the solution is very easy. 
  1. Create a custom object or custom setting to store the notification
  2. Create a visual flow to read the notification stored in custom setting and display it on a screen
  3. Configure login flow to execute the visual flow when a user login
What is login flow?
Login flow provides the ability to build custom business processes and invoke them as users log in. This lets you integrate a custom process with the Salesforce authentication engine, as well as the ability for users to participate in the authentication decision process during the login process.
To be honest, Login flow is nothing new it was introduced in winter '15 release, however it is one of those under-utilized features that not many developer use. 

Detailed Steps:
Step 1: Create a custom object or custom setting to store the notification (we call it Bulletin Board)


Step 2: Create a new Flow (we call it Welcome Notification)

Step 2.1: Create a Fast Lookup element to get the records from Bulletin Board, assign the records to an Sobject Collection Variable (alertList), you can add filters to your lookup condition and also sort the records as per your requirement.


Step 2.2: Create a Loop element to iterate through the records (there could be multiple) and assign them to a Sobject Variable (AlertRec)


Step 2.3: Create an Assignment element to form the content that you want to display, Create text templates to format your content. I have used Bold Start, Bold End and New Line text templates.


Step 2.4: Create a Screen element to display the content


Step 2.5: Once you done creating these elements, your flow should look like, don't forget to mark your Fast Lookup as start element


Step 3: Create a new Login Flow (we call it Login Message), Select the Visual flow and profiles you want it to be enabled. 


Tip: Assign your Login Flow to a non System admin profile first. An incorrect login flow can lock you out of your org permanently.


Thursday, October 6, 2016

Dynamic UI in salesforce

Why do I need dynamic UI
Dynamic UI is useful in scenarios where the variation in UI are too large to be handled as field set or by building conditional logic in the code. For eg: A global client has presence in 100+ countries around the global. At the core the sales process has same fundamentals however each country have their own regional nuances such has different data capture requirements, different validations etc.
Solution: Dynamic UI generated at run time.

Recipe for generating dynamic UI
  1. Custom Metadata to store the field details that needs to be displayed
  2. DynamicUIHelper to build the Dynamic Components
  3. VF Page to call Apex:DynamicComponents
  4. Apex Controller to call DynamicUIHelper
Step 1: Create a custom metadata type (UI Setting) to store the metadata information that would be used to generate the UI

Why custom metadata?
There are two key benefits of using custom metadata type instead of a custom object or custom settings
  1. The query for fetching information from custom metadata are not counted towards SOQL limits for the transaction. 
  2. Apex test class can see values in custom metadata without using "SeeAllData" annotation.
For more details on custom metadata type please refer: Custom Settings vs Custom Metadata


  • Country Applicable: Stores country name for which the fields should be displayed in the UI. You could replace this field with any other fields that defines your filter criteria.
  • Help Text Reference: Allows you to have multiple help text for same field. 
  • Object Name: Stores API Name of custom object where the field resides
  • Required?: If the field should be marked as required in the UI
  • Screen Name: Stores name of the VF Page where the fields will be displayed
  • Screen Sequence: The sequence in which the fields should be added:
Optional:
  • Group Sequence: Could be used to group fields in page sections in the UI
  • Custom Style: Could be used to add a custom style sheet to the fields.
Step 2: Create an Apex class that will read the information stored in the "UI Setting" metadata type and generate UI Components

 public class DynamicUIHelper {  
   Map<String,Schema.SObjectType> gd;  


   //Constructor to initialize variables  
   public DynamicUIHelper()  
   {  
     gd = Schema.getGlobalDescribe();  
   }

 
   /*  
   * Method to generate dynamic UI  
   * Paramters   
   * ScreenName : Screen for which UI needs to be generated  
   * CountryName: Country for which UI needs to be generated  
   * ObjName : Object where data will be stored  
   * prefix: Reference of the Object to be used to bind fields with the object from Controller  
   */  
   public Component.Apex.OutputPanel fetchUI(String screenName,String countryName, String objName, String prefix)  
   {  
     //Declare variable  
     //create an outer panel  
     Component.Apex.OutputPanel opPanel = new Component.Apex.OutputPanel();  
     Map<String,String> fieldAPILabelMap = new Map<String,String>();  
     List<UI_Settings__mdt> fieldInfoList = new List<UI_Settings__mdt>();  
     List<FieldSetWrapper> fsetList = new List<FieldSetWrapper>();  
     //schema defination for the target sObject  
     Schema.SObjectType sobjType = gd.get(objName);   
     Schema.DescribeSObjectResult describeResult = sobjType.getDescribe();   
     Map<String,Schema.SObjectField> fieldsMap = describeResult.fields.getMap();   
     //Iterate through the fieldMap and prepare fieldAPI and fieldLabel   
     for(String fieldName: fieldsMap.keySet())  
     {  
       fieldAPILabelMap.put(fieldName, fieldsMap.get(fieldName).getDescribe().getLabel());  
     }  
     //query information from UI Settings Metadata and create list of wrapper class  
     fieldInfoList = [Select Id,DeveloperName,Country_Applicable__c,Help_Text_Reference__c,  
                 Object_Name__c,Required__c,Screen_Name__c, Screen_Sequence__c,Field_API_Name__c  
              from  UI_Settings__mdt  
              where Screen_Name__c =: screenName AND Object_Name__c =: objName AND Country_Applicable__c =: countryName  
              order by Screen_Sequence__c];  
     for(UI_Settings__mdt uiRec: fieldInfoList)  
     {  
       String fieldLabel;  
       String fieldApi;  
       fieldLabel = fieldAPILabelMap.get(uiRec.Field_API_Name__c);  
       fieldApi = uiRec.Field_API_Name__c;  
       FieldSetWrapper fWrp = new FieldSetWrapper(fieldApi,fieldLabel,uiRec.Required__c,fieldApi);  
       fsetList.add(fWrp);  
     }  
     //add page block section  
     Component.Apex.PageBlockSection pbSec = new Component.Apex.PageBlockSection();  
     pbSec.title = 'Some Title';  
     pbSec.columns = 2;  
     //add the section to opPanel  
     opPanel.childComponents.add(pbSec);  
     for(FieldSetWrapper fw: fsetList)  
     {  
       //create input field  
       Component.Apex.InputField inpField = new Component.Apex.InputField();  
       //assign uique id to element  
       inpField.id = fw.fieldAPI;  
       inpField.label = fw.fieldLabel;  
       //assign value to the input field  
       inpField.expressions.value = '{!'+prefix+'.'+fw.fieldAPI+'}';  
       //create output label for the field  
       Component.Apex.OutputLabel outlbl = new Component.Apex.outputLabel();  
       outlbl.value = fw.fieldLabel;  
       //add label to the input field  
       inpField.childComponents.add(outlbl);  
       //add field to the page block section  
       pbSec.childComponents.add(inpField);  
     }  
     return opPanel;  
   }  


   //wrapper class  
   public class FieldSetWrapper  
   {  
     public String fieldapiname {get;set;}  
     public String fieldLabel {get;set;}  
     public Boolean required {get;set;}  
     public String fieldAPI {get;set;}  
     public FieldSetWrapper(String apiname, String flabel, Boolean req, String ssfieldAPI)  
     {  
       fieldapiname = apiname;  
       fieldLabel = flabel;  
       required = req;  
       fieldAPI = ssfieldAPI;  
     }  
   }  
 }  

Step 3: Create a visualforce page that will call dynamic component


 <apex:page controller="AccountVFController">  
   <apex:form >  
     <apex:pageBlock >  
          <!-- CALL DYNAMIC COMPONENT -->  
       <apex:dynamicComponent componentValue="{!opPanelAccount}"/>  
        </apex:pageBlock>  
   </apex:form>  
 </apex:page>  

Step 4: Create apex controller that will call the helper class and pass the filter parameter countryName, Screen or UI name, SObject where data would be stored and instance of that SObject.


 /*  
 *  Controller for AccountVF  
 *  Author: Prateek Sengar  
 */  
 public class AccountVFController   
 {  
   public transient Component.Apex.OutputPanel opPanelAccount{get; set;}  
   public Account acc{get;set;}  
   //Constructor  
   public AccountVFController()  
   {  
     //call DynamicUIHelper to generate FetchUI  
     DynamicUIHelper DUIRef = new DynamicUIHelper();  
     //get screenName based on your condition  
     String screenName = 'Demo Screen';  
     //get countryName based on your condition  
     String countrName = 'United States of America';  
     //call the method to generate dynamic UI  
     opPanelAccount = DUIRef.fetchUI(screenName ,countrName ,'Account', 'acc');  
   }  
 }  

Friday, September 30, 2016

Custom Settings VS Custom Metadata

What are custom metadata?
Before we get into custom metadata, lets first try to understand what is metadata? Metadata is simplest terms can be defined as data about your data. In other words its the information about your data. For eg: If you add a field on your account object. You would need to know its type (text, number, picklist etc), whether its required or optional, is there any default value etc. All this definition about your data is called metadata.

Custom metadata takes this concept and extends it by allowing developers to define there own metadata. 

OK, but where is it used?
Custom metadata types are ideal for any records that represent metadata for your app. In other words any records that represents configuration or controls the behavior of your app can be considered for custom metadata. For eg: You want to integrate your application with a number of endpoint. Typically you would create custom objects or custom settings to store the information about the API's. Each record would represent an actual integration. 
The problem with using custom object or custom settings for storing this information is that you can only deploy the definition of custom object or custom settings into another org. The records needs to be transferred separately in some other way. 
Solution: Metadata to rescue. Since the records of custom metadata are treated as metadata they can be deployed from one sandbox to another using change set or managed packages.

Will custom metadata replace custom settings?
In most of the cases Yes, custom metadata type can replace custom settings however there are use cases where you might want to use custom settings. Please see the below decision tree and comparison chart that could help you in deciding what to use.

Decision Tree


Comparison Chart

How to use custom metadata?

Creating custom metadata is very similar to creation of custom object or custom settings.
Step 1: Go to Setup and search for "Custom Metadata Types"

Step 2: Click on "New Custom Metadata Type"

Step 3: Save Custom Metadata Type

Step 4: Click on "New" in custom field section


Step 5: Create the required fields

Step 6: Click on "Manage UI Settings"

Step 7: Click on New and Create Records

Step 8: Query in Apex
 List<UI_Settings__mdt> fieldInfoList = [SELECT Id, DeveloperName, Country_Applicable__c, Help_Text_Reference__c, Object_Name__c, Required__c, Screen_Name__c, Screen_Sequence__c, Field_API_Name__c FROM UI_Settings__mdt];  


Thursday, September 22, 2016

Apply lightning design system (LDS) to existing visualforce pages

Disclaimer: General recommendation from salesforce - For existing pages - you don’t try to adapt them to match the visual design of Lightning Experience. There are two reasons for this. First, Lightning Experience is still evolving, and matching its styling yourself means you’re chasing a moving target. That’s work. Second, it’s even more work if you don’t have the tools to do it. In the current release, the tools are mostly not there. We have a number of ideas here and, Safe Harbor, we’re already hard at work at bringing them to you in a future release. So if you can wait, that’s our recommendation.

How to apply LDS to my existing visualforce pages
OK before we start modifying our code, lets first review few things to remember
  • <apex:pageblock> and <apex:inputField> are not supported with LDS, so unless you want your VF pages to be mix of LDS and classic view you need to refactor your code to avoid these elements.
  • If you are planning to use SVG Spritemap icons, add the attribute xmlns="http://www.w3.org/2000/svg" xmlns:xlink="http://www.w3.org/1999/xlink" to the <html> element or the parent <div> element
  • If using SVG spritemap image icons with IE, use the svg4everybody script

Now that we know what to look for lets try it out
First lets consider an existing VF page, this page creates account and contact record.

AccountContactVF

 <apex:page controller="AccountContactController">  
   <!-- ADD SECTION HEADER -->  
   <apex:sectionHeader title="Demo VF Page" subtitle="Create Account and Contact"/>  
   <apex:form >  
   <!-- CREATE PAGE BLOCK -->  
     <apex:pageBlock mode="edit">  
         <!-- SECTION TO CREATE ACCOUNT -->  
         <apex:pageBlockSection title="Account Info" columns="2">  
              <apex:inputField value="{!acc.Name}"></apex:inputField>  
           <apex:inputField value="{!acc.Type}"></apex:inputField>  
           <apex:inputField value="{!acc.ShippingStreet}"></apex:inputField>  
           <apex:inputField value="{!acc.ShippingCity}"></apex:inputField>  
           <apex:inputField value="{!acc.ShippingState}"></apex:inputField>  
           <apex:inputField value="{!acc.ShippingCountry}"></apex:inputField>  
           <apex:inputField value="{!acc.Shippingpostalcode}"></apex:inputField>  
         </apex:pageBlockSection>  
         <!-- SECTION TO CREATE CONTACT -->  
         <apex:pageBlockSection title="Contact Info" columns="2">  
              <apex:inputField value="{!con.FirstName}"></apex:inputField>  
           <apex:inputField value="{!con.LastName}"></apex:inputField>  
           <apex:inputField value="{!con.HomePhone}"></apex:inputField>  
           <apex:inputField value="{!con.MobilePhone}"></apex:inputField>  
         </apex:pageBlockSection>  
         <!-- ADD BUTTONS -->  
         <apex:pageBlockButtons >  
           <apex:commandButton value="Clear"/>  
           <apex:commandButton value="Save" action="{!saveAccCont}"/>  
         </apex:pageBlockButtons>  
     </apex:pageBlock>  
   </apex:form>  
 </apex:page>  


Lets take a quick look at the above VF page, just by looking at the page we can see that for the page to render properly we need make the following changes.

Must Have or Kind Of Must Have Changes:
  • apex:pageblock needs to be replaced with slds-panel
  • apex:inputfield needs to be replaced with apex:inputtext, apex:selectlist etc
  • apex:pageblocksection needs to be replaced with slds-panel__section
  • apex:pageblockbuttons needs to be replaced with a combination of slds-docked-form-footer and slds-button-group
  • Since we would be replacing few apex:inputField with apex:selectlist, we need to update the controller to handle the picklist values.
Optional or Nice To Have Changes:
  • Use slds-form--compound to allow better grouping of fields
  • Use inline icon to stylize text fields
  • Replace apex:pagesectionheader with slds-global-header_container

After making the necessary changes our VF page code will look like:

AccountContactLds

 <apex:page controller="AccountContactController" applyBodyTag="false" docType="html-5.0">  
   <head>  
     <!-- CUSTOM GENERATED STYLE SHEET -->  
     <apex:stylesheet value="{!URLFOR($Resource.SLDS212, 'assets/styles/salesforce-lightning-design-system-vf.css')}" />  
   </head>   
   <body>  
     <!-- REQUIRED SLDS WRAPPER - CUSTOM SCOPING CLASS USED WHEN GENERATING CUSTOM CSS -->  
     <div class="trailhead-lightning">  
       <!-- ADD GLOBAL HEADER -->  
       <header class="slds-global-header_container">  
         <!-- ADD GLOBAL HEADER ICON -->  
         <!-- ADD FLOT AND SPACING TO HAVE BOTH ICON AND TEXT IN SAME LINE -->  
         <div class="slds-col slds-float--left slds-m-right--small">  
           <!-- ADD ICON -->  
           <div class="slds-icon slds-icon_container slds-icon-standard-account slds-icon--medium">  
             <img src="{!URLFOR($Resource.SLDS212,'/assets/icons/standard/account_60.png')}" alt="" />    
           </div>   
         </div>  
         <!-- ADD GLOBAL HEADER TEXT -->  
         <div class="slds-col ">  
           <!-- ADD TEXT -->  
           <div class="slds-page-header__title slds-truncate">  
             Create Account and Contact  
           </div>  
         </div>  
       </header>  
       <!-- ADD PANEL -->  
       <div class="slds-panel slds-grid slds-grid--vertical slds-nowrap slds-form--compound" aria-labelledby="newaccountform">  
         <apex:form >  
           <!-- ADD SECTION GROUPS -->  
           <div class="slds-panel__section">  
             <legend class="slds-form-element__label slds-text-title--caps">ACCOUNT INFO</legend>  
             <div class="form-element__group">  
               <!-- ADD ROW -->  
               <div class="slds-form-element__row">  
                 <!-- ADD FIELDS -->  
                 <div class="slds-form-element">  
                   <apex:outputLabel styleClass="slds-form-element__label">Account Name</apex:outputLabel>  
                   <apex:inputText value="{!acc.Name}" styleClass="slds-form-element__control slds-input"/>  
                 </div>  
                 <div class="slds-form-element">  
                   <apex:outputLabel styleClass="slds-form-element__label">Account Type</apex:outputLabel>  
                   <apex:inputText value="{!acc.Type}" styleClass="slds-form-element__control slds-input"> </apex:inputText>  
                 </div>  
               </div>  
               <!-- ADD ROW -->  
               <div class="slds-form-element__row">  
                 <div class="slds-form-element">  
                   <apex:outputLabel styleClass="slds-form-element__label">Shipping Street</apex:outputLabel>  
                   <apex:inputTextarea value="{!acc.ShippingStreet}" styleClass="slds-form-element__control slds-textarea"/>  
                 </div>  
               </div>  
               <!-- ADD ROW -->  
               <div class="slds-form-element__row">  
                 <div class="slds-form-element">  
                   <apex:outputLabel styleClass="slds-form-element__label">Shipping City</apex:outputLabel>  
                   <apex:inputText value="{!acc.ShippingCity}" styleClass="slds-form-element__control slds-input"/>  
                 </div>  
                 <div class="slds-form-element">  
                   <apex:outputLabel styleClass="slds-form-element__label">Shipping State</apex:outputLabel>  
                   <apex:inputText value="{!acc.ShippingState}" styleClass="slds-form-element__control slds-input"/>  
                 </div>  
               </div>  
               <!-- ADD ROW -->  
               <div class="slds-form-element__row">  
                 <div class="slds-form-element">  
                   <apex:outputLabel styleClass="slds-form-element__label">Shipping Country</apex:outputLabel>  
                   <apex:selectList value="{!acc.ShippingCountry}" styleClass="slds-form-element__control slds-select slds-select_container" size="1">  
                        <apex:selectOptions value="{!countryList}"></apex:selectOptions>  
                   </apex:selectList>  
                 </div>  
                 <div class="slds-form-element">  
                   <apex:outputLabel styleClass="slds-form-element__label">Shipping Postal Code</apex:outputLabel>  
                   <apex:inputText value="{!acc.ShippingPostalCode}" styleClass="slds-form-element__control slds-input"/>  
                 </div>  
               </div>  
              </div>  
           </div>  
           <!-- SECTION GROUP ENDS-->  
           <!-- ADD SECTION GROUPS -->  
           <div class="slds-panel__section">  
             <legend class="slds-form-element__label slds-text-title--caps">CONTACT INFO</legend>  
             <div class="form-element__group">  
               <!-- ADD ROW -->  
               <div class="slds-form-element__row">  
                 <div class="slds-form-element">  
                   <apex:outputLabel styleClass="slds-form-element__label">First Name</apex:outputLabel>  
                   <apex:inputText value="{!con.FirstName}" styleClass="slds-form-element__control slds-input"/>  
                 </div>  
                 <div class="slds-form-element">  
                   <apex:outputLabel styleClass="slds-form-element__label">  
                     <abbr class="slds-required" title="required">*</abbr>   
                     Last Name  
                   </apex:outputLabel>  
                   <apex:inputText value="{!con.LastName}" styleClass="slds-form-element__control slds-input"/>  
                 </div>  
               </div>  
               <!-- ADD ROW -->  
               <div class="slds-form-element__row" xmlns="http://www.w3.org/2000/svg" xmlns:xlink="http://www.w3.org/1999/xlink">  
                 <div class="slds-form-element">  
                   <apex:outputLabel styleClass="slds-form-element__label">Phone Number</apex:outputLabel>  
                   <div class="slds-form-element__control slds-input-has-icon slds-input-has-icon--left">  
                     <svg aria-hidden="true" class="slds-input__icon">  
                      <use xlink:href="{!URLFOR($Resource.SLDS212,'/assets/icons/utility-sprite/svg/symbols.svg#call')}"></use>  
                     </svg>  
                     <apex:inputText value="{!con.HomePhone}" styleClass="slds-input" html-placeholder="(333) 333-3333"/>  
                   </div>  
                 </div>  
                 <div class="slds-form-element">  
                   <apex:outputLabel styleClass="slds-form-element__label">Mobile Number</apex:outputLabel>  
                   <apex:inputText value="{!con.MobilePhone}" styleClass="slds-form-element__control slds-input" html-placeholder="(444) 444-4444"/>  
                 </div>  
               </div>  
             </div>  
           </div>  
           <!-- FOOTER -->  
           <div class="slds-panel__section">  
             <div class="slds-docked-form-footer slds-button-group slds-float--right" role="group">  
               <apex:commandButton value="Clear" styleClass="slds-button slds-button--neutral"/>  
                     <apex:commandButton value="Save" action="{!saveAccCont}" styleClass="slds-button slds-button--brand"/>  
             </div>  
           </div>  
         </apex:form>  
       </div>  
     </div>  
   </body>  
 </apex:page>  

Supporting Apex Controller

 public class AccountContactController {  
   public Account acc{get;set;}  
   public Contact con{get;set;}  
   public AccountContactController()  
   {  
     acc = new Account();  
     con = new Contact();  
   }  
   public pageReference saveAccCont()  
   {  
     PageReference pg = null;  
     if(acc != null)  
     {  
       insert acc;  
       if(con != null && acc.Id != null)  
       {  
         con.AccountId = acc.Id;  
         insert con;  
         pg = new PageReference('/'+acc.Id);  
         return pg;  
       }  
       else  
       {  
         return pg;  
       }  
     }  
     else  
     {  
          return pg;  
     }  
   }  
   public List<SelectOption> getCountryList()  
   {  
     List<SelectOption> countryList = new List<SelectOption>();  
     countryList.add(new SelectOption('US','US'));  
     countryList.add(new SelectOption('CANADA','CANADA'));  
     countryList.add(new SelectOption('MEIXCO','MEIXCO'));  
     return countryList;  
   }  
 }  

Output
As you can see its quite a bit of work to apply lds to existing VF pages. However if you want to align the look and feel of your VF pages with lightning experience its well worth it.

Screenshots
Classic VF Page
LDS VF Page

Monday, September 19, 2016

Why and how to backup salesforce data

Why backup salesforce data? Isn't this done by salesforce automatically?
Yes, Salesforce does perform real time replication to disk for each of their data centers, and near-real time data replication between production data center and disaster recovery center. However, there are quite a few scenarios why you might want to have your own backup. Scenarios such as:

  1. Recover from data corruption
  2. Rollback for data migration activity
  3. Archive data to reduce data volume or to adhere to data retention policies
  4. Replicate data to warehouse

How to backup data?
Depending upon your backup requirements (Full, Incremental, Partial) you can choose to use salesforce native features such as Data Export or Data Loader or you can build your own custom solution. In case you decide to build your own solution there are 4 API's that you can choose from.

  • REST API
  • BULK API
  • SOAP API
  • Metadata API
How to choose the right API for the job?
Before we jump into identifying the right API for the job, lets first understand some of the limitation around these API's, knowing about these limitation will help us in deciding which API to use:


API
Governor Limit
Additional consideration
Objects Not supported
REST or SOAP
Unlimited Edition: 15,000 + (number of licenses X calls per license type) calls per 24-hour period.
The calculation of the API request limit based on user licenses is designed to allow sufficient capacity for your org based on your number of users. If you need a higher limit and you don’t want to purchase extra user licenses or upgrade to Performance Edition, you can purchase additional API calls

Bulk API
Submit up to 10,000 batches every 24-hour.
Batch older than 7 days are removed from queue.
Each batch cannot be more than 10Mb in size
Batch can contain a max or 10,000 records

Each batch is divided into chunk of 200records.
Each chunk can take up to 5 mins of processing and total time allowed for complete batch is 10 mins.
If batch takes more than 10 mins its put into queue for later processing, if batch takes more than 10 mins for 10 attempts its marked as failed.
CaseStatus
ContractStatus
KnowledgeArticle
KnowledgeArticleVersion
KnowledgeArticleVersionHistory
KnowledgeArticleViewStat
KnowledgeArticleVoteStat
LeadStatus
OpportunityStage
PartnerRole
RecentlyViewed
SolutionStatus
TaskPriority
UserRecordAccess

Now that we have a high level understanding on the limitation on API's lets consider some common use cases:

Use Case 1: Need to back up object containing a large volume of records (more than 2 million):
Recommendation: Bulk API - Bulk API are generally faster then SOAP and Rest API

Use Case 2: Back up data but also preserve limits regarding number of API calls per 24 hours:
Recommendation: Bulk API - Bulk API do not consume API Calls but consume Bulk API calls. Useful for orgs with less number of user licenses.

Use Case 3: Back up data but preserve bulk API limits:
Recommendation: REST or SOAP API - REST or SOAP API do not consume Bulk API limits however they have there own limitation, Useful for orgs where Bulk API are utilized for other activities.

Use Case 4Backup an object that contains a lot of XML-like information
Recommendation: REST or SOAP API While this is not directly caused by the Salesforce SOAP API, we have seen some XML parsers encountering difficulties when processing the HTTP response (mix of XML-based protocol and XML data)

Use Case 5 Backup an object that is not yet supported by the Bulk API 
Recommendation: REST or SOAP API - Well the objects are not supported in Bulk API

Use Case 6: You need to backup metadata
Recommendation: Metadata API - Well there are not much options, may be you can think of use Tooling API however Tooling API is meant for developing interative application or developer tools. For more details see when to use tooling api


Wednesday, September 14, 2016

Geocoding - Summer 16

Few days back (OK may be months, but who is counting) salesforce came up with Automatic Geocoding. This feature (no points for guessing what it does) allows you to geocode your address fields automatically.

Any limitations?
Like with any new feature Automatic Geocoding is only supported on limited fields such as
  • Billing Address on accounts
  • Shipping Address on accounts
  • Mailing Address on contacts
  • Address on leads

OK, How to get started?
Actually its quite simple:

  1. To enable this just go to Setup, search for ‘Clean Rules' in quick find and click on Clean Rules from the resulting setup.  
  2. Edit one of the four available rules.
  3. Review, Save and Activate. 
  4. Repeat Step 2 and 3 for other rules (if required).
Clean all records setup option


Where and how is this information stored?
Geocodes are added to the pre-existing latitude and longitude fields on accounts, contacts, and leads. Along with latitude and longitude information this feature populates the accuracy field also. Geocoding accuracy is populated as a selection list which has 11 values


Note:
By default, geocode and accuracy fields aren’t visible on records
Geocodes do use data.com technology, but you don't require data.com licenses to use it. So don't sweat.